Pages

Sunday, 22 October 2017

ESAD 2017 Holiday Catalogue Fancy Folds and 3D projects blog hop


Welcome to ESAD 2017 Holiday Catalogue Fancy Folds & 3D projects,
a group of 22 ESAD artists here to wet your appetite for all things creative.


I made something that is similar to this talented Australian artist Simone Bartrum
who created a masterpiece of a 3D card with Ready for Christmas and Staircase builder...Layers upon layers, lots of inspiration in this piece.
 

I wanted to make it in a Card in a box....I have BUT I cut it off and now I don't like it so I may have to create another box. This is how it started out...
I used Soft Suede and Crumb Cake re-inkers to add to the Embossing paste to create my brick wall of my box, creating the varying colours on the wall.

Next was the fun task of stamping and cutting all the elements out to create the Tree with decorations, Staircase and Table with cookies...All I can say is I am truly Thankful to the creators of this suite when they designed dies to cut almost everything out on the Big Shot....Such a time saver.


I had so much fun decorating all the elements, BUT unfortunately my tablet went flat with all my images on it, BUT I am sure that you don't need to see all of the bits to create my card....Sorry for the blurry images taken on my phone.


 Up next is Sue Vine
I did create these a couple of weeks ago that fit the criteria of today's Blog Hop too.

The first one is a wiper card
, using seasonal chums and Seasonal Tags Framelits


 This one is a Diamond Fold


https://kocreationscards.blogspot.com.au/2017/10/esad-2017-holiday-catalogue-fancy-folds.html

Blog Hop Participants:
14. Sue Vine

Thanks for visiting and please remember if you loved my projects please leave me some love below in the comments....Please follow the rest of the blog hop to see what everyone created.
Cheers Shaz

Thursday, 19 October 2017

Stampin' Dreams Blog Hop BW+1


I apologise in advance... You may see differing size fonts, Blogger is causing me grief atm.
Hello once again everyone...Back with this lovely group of talented artists featuring in this Black & White with 1 Blog Hop...You might be starting the Hop with me or you could have joined me from Jenny's blog
It is funny how these cards came about, I had been using the Merry Music Speciality DSP creating Christmas Cards and as soon I grabbed this piece of paper I knew that I had to use RED it was the obvious colour considering I was creating Christmas cards...
I have been wanting to try this technique called Retiform...Have you heard of it???
Definition of retiform. :composed of crossing lines - grid like.  


Here are some variations I have seen on Pinterest
Next was which stamp set would I pick. So many to choose from out of the new Holiday catalogue. AND the perfect stamp was Ready for Christmas with the cutest dachshund in it...This set comes with matching bundle Christmas Staircase 146056 to create a Staircase and Christmas Tree with the dachshund sniffing the cookies on the table...Cute puppy.
Here are a couple more that I tried with technique, I am by no means an expert of this technique BUT I like what I have done with it...I used the Hostess Only set Merry Patterns.
This set cannot be purchased, it can be earnt when holding an in house workshop with $450 AU in sales. Contact me to ask me how you can get a set in your hands before the end of October.

The last card I created is probably most like the true form of Retiform, I used Painted Harvest 144783 also from the Holiday catalogue. Firstly I used Whisper White Thick cardstock and I masked off sections with some cardstock then I used a sponge dauber to add the Cherry Cobbler ink in sections... Once this is complete it looks like this.
Then I added some post it notes and stamped the leaves in certain sections and then I added the Sunflower in the bigger sections...Lastly I added  the sentiment.

You can download a copy of the catalogue by clicking on the cover below. If you wish to have a hard copy, please contact me and I will post one to you.
http://su-media.s3.amazonaws.com/media/catalogs/2017%20Holiday%20Catalog/Holiday%20Catalogs/20170614_Holiday17_en-AU.pdf
Next up is Kim Oliver Kim, always has gorgeous projects so I am sure tonight will be no different. Below is the full list of Blog Hop participants. Hope you have enjoyed the many varied projects and if you want to join in be sure to like Stampin' Dreams Blog Hop Group on FB to hop along with us next month...Cannot wait for November Hop it is your favourite technique, which is yours??? See you all then...
Please leave me some love in the comments  xoxo Cheers Shaz


Sunday, 3 September 2017

ESAD September 2017 Holiday Catalogue Bloghop

Santa got all of his gear off after a hard day and night at work delivering all the presents to the kids around the world


Welcome everyone to our ESAD 2017 Holiday Catalogue Blog Hop, WOW 32 participants...This is going to be the coolest hop!!! As the Holiday Catalogue just launched on Sept 1...SO many Gorgeous products to help you create your Christmas Cards and Boxes and so much more to create this holiday season

You would have seen a really AMAZING project from Chloe Evans I decided to use Santa's Suit for this Blog Hop, I have only had it since Friday waiting on my pre orer to arrive....
I had previously made a Waterfall card with the  Message in a Bottle, so I had to use this style for my card today...
Using Cherry Cobbler, Whisper White and the Tranquil Tide stripe paper is from Pick A Pattern DSP and Merry Music DSP


I will add the How to's a bit later....Instructions haven't finished being written up


This looks like a hard card BUT really it is just a matter of scoring and sticking it all down.
Here is the two cards that I made today with the Santa's Suit.


https://cardsbycarly.wordpress.com/2017/09/03/esad-2017-holiday-catalogue-blog-hop/
Up next is Carly Middleton


ESAD have so many talented members and we all love to share our inspiration, we are passionate about Stampin' Up products
Please don't forget to leave me some love and I will return it on your Blog and I am sure that I will be AMAZED by all the wonderful projects made for this hop.


Have a great night, grab yourself a drink and sit back and enjoy the hop
Blog Hop Participant List


Wednesday, 30 August 2017

Father's Day Scrapbooking Layout and Card

Hello everyone, it's been a while...It seems that lately I only post when I have a challenge to complete or a Blog Hop to follow. So today I am posting a layout and a card from a group of fellow Stampin' Up demonstrators here in the CQ region.

The challenge was set -
Make any project (card, gift package, scrapbooking page, memories & more layout etc) in the theme of Father's Day.  I always seem to leave everything until the last minute so yesterday with only a couple of hours to go until we were meeting up to share our creations... I decided to use Pick a Pattern DSP.

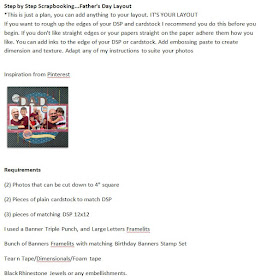
Found some inspiration on the Pinterest pages which wasted more valuable time...BUT I got a  layout plan and created this layout...So I decided that I would also use it for our 1st Step by Step Scrapbooking Layout guide on Scrapbooking Global


Firstly I cut all my cardstock and DSP, plan out my page.

See note at the end of the post for Father's Day card.

Now is the fun bit to assemble the layout...


1. Decide which 12x12 DSP you want to use for your background.

2. Cut 12 x 12 DSP into large circle 10.5'' diameter OR use a dinner plate to trace around and handcut, centre and adhere circle onto your background DSP.


3. Cut 12" x 4" DSP, adhere this piece approx 3" from the top of background DSP  from L to R over the top of your circle DSP.
4. Cut (2) 4.5" x 4.5" Cardstock Squares to use as your photo mounts, you can mount them side by side on your 12" x 4" DSP if you want I decided to stagger mine and I used dimensionals to pop one photo mount up.


5. To create banner, Cut (1) 4.5" x 2" and Cut (1) 3.5" x 1.5" I used cardstock scraps.
I used the Banner Triple Punch to create mine... If you don't have this just use the same measurements and hand cut you banner... I saved the (excess triangle) to add to my banner.


6. Stamp (NO 1) on top banner piece, then add dimensionals to pop it on top of the bottom banner piece. Then I used the (excess triangle) to add a smaller title (You're) to matching cardstock. I used dimensionals again to keep it at the same level as (NO 1).
7. Adhere completed banner to the top RHS corner overlapping the circle DSP and 12" x 4" DSP.


8. Using your Bigshot if you have one, CUT your title (DAD) using Large Letters Framelits. If you don't have these simple stamp your Title onto matching cardstock. I used dimensionals again to pop my letters up.

9. Adhere title (DAD) on to the top of your circle DSP.


10. Stamp out (2) Birthday Banners, add a title (ENJOY TODAY)
11. Using your Bigshot if you have one, CUT your (2) stamped Birthday Banners out, then on  one cut off the tails off both sides....pop the title one on top of remaining banner to create 3D effect.


12.Centre and adhere title banner (ENJOY TODAY) to bottom of your circle DSP.


13. I have fussy cut (to cut around something from your matching DSP) around a camera and flash and popped the flash bit with dimensionals.


14. Add some embellishments to bling up your layout, I used the new Black Rhinestone Jewels from the Holiday catalogue which goes live on Sept 1.
15. Lastly I add my photos, which I will take on Father's Day this Sunday here in Australia.

You know how I said
I cut away all the excess so that I am not wasting so much paper with all the layers on top of eachother. With all the excess DSP I created a Father's Day card too...So no wastage of pretty DSP. 


Thanks for popping by and I hope you have a wonderful Father's Day, with your Dad or your husband and kids on Sunday. Please leave me some love by commenting below and I will pop over to see you too.  Cheers Shaz