Pages

Thursday, 16 November 2023

Scrapbooking Global - Nov 16, 2023 - Layers Upon Layers


Welcome to Nov 16th Scrapbooking Global Blog Hop, which is held monthly.
You can join us over Scrapbooking Global - Stampin' Up!  FB group.
We have over 6000 members, we exclusively use Stampin' Up! products

We have Designs team member and members of the group create a layout
for the specific theme.

This month Delys Cram chose the theme Layer Upon Layer,
I am very HAPPY to say that this is my favourite kind of theme.
I am a layers girl and I love adding layers over layers.

I am sure that this month, you will LOVE what we have all created
as it is something a little bit different to our normal styles.


 Delys Cram as Creative Design Team Member this month, 
her favourite thing to do is add lots of layers to her Scrapbooking layouts.


 It is AMAZING how we start out with the very basics,
Stamps, Ink and Paper.
You may be joining me from Cheryl's Blog
which I am sure from previous layouts that Cheryl creates
it will be a FABULOUS design with this theme.


 AND then you add some layers to your project, here in this photo
I firstly added some Calypso Coral ink  directly to my 12 x12 White Cardstock
with a blending brush and the Foursquare Decorative Masks.
Then over the top of that I changed masks and
added some Shimmery White Embossing Paste with a spatula.
just randomly over the entire surface of my layout.
PLEASE NOTE - Wash your masks and spatula's immediately
after using embossing paste.
ANOTHER NOTE - If your Embossing Paste has harden since the last time
you used it, add little bits of water and moisten it again.
Little by Little is the best way to reactivate it.


 Next I added some stamping and fussy cutting to add some more layers.
I stamped the leaf leayer in Pretty Peacock onto the Delightful Floral DSP
and Fussy cut them out.
Next I stamped Petal Park 2 step stamps in Calypso Coral & Petal Pink
AND also Poppy Parade on Basic White Cardstock and then used
co-ordinating punch to cut all the flowers out.


Same again BUT for the right side of the layout this time <3 


I also used some of the Petal Park Punched Flowers on the Sentimental Park Dies.


Now this idea for the photos came from a French Demonstrator who
presented at OnStage@Home with the Lighter Than Air Suite.
Emilie Veyessilier presented a Birthday invitation so
I thought I would try to make it to include photos.
Which I did in a large version...


I always have trouble with my lighting for my photos, this layout is way brighter 
than what it is showing up here.
I hope you enjoyed my layout with Layers Upon Layers.


Up next is Jill Hamlet with her AMAZING layout...
Please follow along with either the NET button or the link at the end of our post
with all the names of participants.


 I want to say a HUGE THANKS to you who visit my blog and comment it really means a lot to me.  I really do appreciate you leaving me some Lovin' in the form of a comment.

Cheers Shaz


Wednesday, 8 November 2023

Crafty Collaborations - Technique Tuesday - Dry Embossing


The Crafty Collaborations team is comprised of Stampin’ Up! demonstrators
from around the world. Each month, we participate in several collaborative projects including blog hops, like this one, to inspire all of us in our passion for crafting. Our goal is to create, share, and inspire every crafter to keep our creative energy flowing.


 Hi my name is Shaz - I live in Queensland, Australia
I have been a Stampin' Up! Demo for 10yrs now
and I love sharing different techniques to try when cardmaking.
By sharing our crafting knowledge it allows someone to create
something that they may never have thought to try.


This month we are showcasing "Dry Embossing"
Dry Embossing is a cardmaking technique where you create
a raised design or textured patterns without the use of ink or heat.
For my Bee Mine card I raised up my DSP designer series paper with dimensionals
and then I added texture on these raised up hearts with an embossing folder
which I ran through the Stampin' Cut and Emboss Machine.

I chose a product that us as Demonstrators get the opportunity to order
and create with this product before it is actually launched to the everyone else.
I am attending OnStage@Home on Saturday so we got to order this product collection
to use for the projects we are creating on Saturday.
It is an upcoming product in the Jan - April Mini released in Jan 2024.
It is called Bee Mine Suite.


Firstly I chose a piece of DSP to punch out the 2 different sized hearts and
the wonderful thing about Stampin' Up! DSP is that it is 2 sided.
So I chose to punch out the hearts using the white side with the bees
and the petal pink side with sweet sorbet hearts.
I added all the hearts with dimensionals to another piece of DSP with the bee hive on it.
Then I ran it through the Stampin' Cut and Emboss Machine inside the
Basic 3D Embossing Folder that has stars shapes all over it.
This then added a raised edge to our raised shapes.


I added another layer of floral DSP behind that bee hive DSP to give it another layer.
I have an obsession about not wasting any DSP so I cut the inside out of the floral DSP
so that I could use it on another card... check here later for a card made with it.
Then I added all those layers to a Daffodil Delight Cardstock Base.


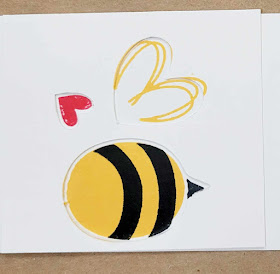
Next I created the bees with the stamp and punch bundle.
The stamp is called Bee My Valentine, it has all the stamped images to create the bee.
Firstly punch out a template so that you can see which way to stamp everything out
so that it punches it all at once. See my example.


Now I created 2 bees one for the front and then one to decorate the inside of the card.
Just use glue to adhere the 2 heart wings to the body and I fussy cut the antennae
and added that to the bee as well.


Next I stamped the insert panel to write on in the middle of the card. 
I like to create a similar image to what is on the front of the card on the inside too.
As well as decorating the envelope.


Card Base - Daffodil Delight - 4 1/8" x 5 7/8" or 10.5cm x 14.85cm
Layer 1 - Sweet Sorbet Floral DSP - 4"" x 5 3/4" or 10.3cm x 14.5cm
Layer 2 - Petal Pink Bee Hive DSP - 3 7/8" x 5 5/8" or 10cm x 14.3cm
Layers 3 - Punched hearts from DSP - Small and Large hearts punch
Layer 4 - Basic White Cardstock scrap to create the bees
Card Insert - Basic White Cardstock - 3 7/8" x 5 5/8"


I hope you liked my card, please pop over to the rest of the Blog Hop
and see what the others created for "Dry Embossing"
Please leave me some LOVE in the form of a comment.
I really appreciate you taking the time to look at the Blog Hop.


Until next time, Happy Creating Cheers Shaz

Shop here