The Crafty Collaborations team is comprised of Stampin’ Up!
demonstrators
from around the world. Each month, we participate in
several collaborative projects including blog hops, like this one, to
inspire all of us in our passion for crafting. Our goal is to create,
share, and inspire every crafter to keep our creative energy flowing.
I have been a Stampin' Up! Demo for 10yrs now
and I love sharing different techniques to try when cardmaking.
By sharing our crafting knowledge it allows someone to create
something that they may never have thought to try.
Dry Embossing is a cardmaking technique where you create
a raised design or textured patterns without the use of ink or heat.
For my Bee Mine card I raised up my DSP designer series paper with dimensionals
which I ran through the Stampin' Cut and Emboss Machine.
I chose a product that us as Demonstrators get the opportunity to order
and create with this product before it is actually launched to the everyone else.
I am attending OnStage@Home on Saturday so we got to order this product collection
to use for the projects we are creating on Saturday.
It is an upcoming product in the Jan - April Mini released in Jan 2024.
It is called Bee Mine Suite.
the wonderful thing about Stampin' Up! DSP is that it is 2 sided.
So I chose to punch out the hearts using the white side with the bees
and the petal pink side with sweet sorbet hearts.
I added all the hearts with dimensionals to another piece of DSP with the bee hive on it.
Then I ran it through the Stampin' Cut and Emboss Machine inside the
Basic 3D Embossing Folder that has stars shapes all over it.
This then added a raised edge to our raised shapes.
I have an obsession about not wasting any DSP so I cut the inside out of the floral DSP
so that I could use it on another card... check here later for a card made with it.
Then I added all those layers to a Daffodil Delight Cardstock Base.
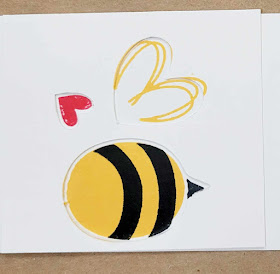
Next I created the bees with the stamp and punch bundle.
The stamp is called Bee My Valentine, it has all the stamped images to create the bee.
Firstly punch out a template so that you can see which way to stamp everything out
so that it punches it all at once. See my example.
Now I created 2 bees one for the front and then one to decorate the inside of the card.
Just use glue to adhere the 2 heart wings to the body and I fussy cut the antennae
and added that to the bee as well.
I like to create a similar image to what is on the front of the card on the inside too.
As well as decorating the envelope.
Card Base - Daffodil Delight - 4 1/8" x 5 7/8" or 10.5cm x 14.85cm
Layer 1 - Sweet Sorbet Floral DSP - 4"" x 5 3/4" or 10.3cm x 14.5cm
Layer 2 - Petal Pink Bee Hive DSP - 3 7/8" x 5 5/8" or 10cm x 14.3cm
Layers 3 - Punched hearts from DSP - Small and Large hearts punch
Layer 4 - Basic White Cardstock scrap to create the bees
Card Insert - Basic White Cardstock - 3 7/8" x 5 5/8"
I hope you liked my card, please pop over to the rest of the Blog Hop
and see what the others created for "Dry Embossing"
Please leave me some LOVE in the form of a comment.
I really appreciate you taking the time to look at the Blog Hop.
Until next time, Happy Creating Cheers Shaz
Shop here


Great touch embossing the hearts.
ReplyDeleteSuch a fun card Shaz, love it x
ReplyDelete