Thursday 20 January 2022

Scrapbooking Global - Stampin' Up! January Blog Hop - Decorative Borders


Just a lil sneak peak...


 Welcome to January Blog Hop,  
Each month
one of our Design Team picks a Theme to challenge our creativity.
We’d love it if you join us each month! We usually hop the 3rd Thurs of the Month.
Sherry Roth picked this month's theme of Decorative Borders.


 I can only imagine that Sherry's Scrapbook design will be something AMAZING
as she's very creative with her style.
We have quite a full line up for this hop with 12 of us hoping this month.
Cannot wait to see all the designs from the talented ladies.


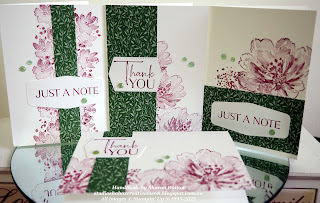
 So mine started out this morning with just using the Heart & Home Suite
using the doiley's as my border design...
Then I decided it needed some more elements to create a decorative border.
Adding a strip of DSP of the wood pallet design from the matching papers
BUT I felt like it still needed something else so I added 2 strips
cut from the Memories & More Cards and Envelopes.
Then I added some of the beautiful matching Denim ribbon to the layers...
    Once again looking at my border design I felt like it was lacking a lil lil something.
So I cut up some more doiley's to the already created border.
Finally I was happy with my border design.


So then come the designing of the rest of the layout...
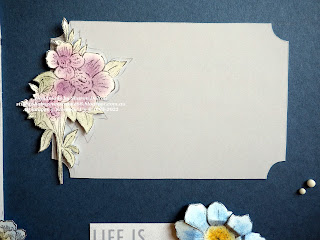
Sticking with this suite I chose to stamp the largest image from
Blessings of Home Cling Stamp. 
The florals on this stamp are just devine!!!
Wanting to add just a bit of colour to this layout on the flowers
I used the Soft Pastels Assortment with versamark and the different colours from the palette.
None of these colours from the  are in the background colour of Misty Moonlight
BUT they added just what I wanted.


How you lay down your colour on your Basic Gray image.
Using a dauber you firstly add versamark to the dauber and dab that on the part
of the flower that you want to colour a specific colour...
As the versamark dries quickly you need to work in small sections
and add the colour from the soft pastels (which I just scrap with a metal ruler)
onto my silicon mat in different areas.


Here is one of our talented Creative Design Team member using pastels
Check out this video from Sharni Haines she shows you how she used the pastels.

I also wanted to add some dimension to the centre bloom of the floral cluster.
So I stamped out 3 more centre petals, coloured with the Night of Navy
and pollen centre with Daffodil Delight pastel cut that away.

Creasing and folding the petals to give the flower some more dimension
the adding Mini Stampin Dimensionals to give that lift.
Then I added the pollen centre of the flower with some more dimensionals.

Adding to the decorative border theme, I cut the centre out of
one of the cards from the Memories and More pack...
This became my frame for my photo and the inside of it
became my journalling block.


Using another Memories and More cards for the title,
I simply just cut the word away from the card and added another flowers


I do hope that this inspires you to try this technique in one of your future projects.
Not really sure what the technique called.

Up next is Delys Cram with her layout, I am wondering what Delys has used for this theme.
No matter what she does, it is always AWESOME!!!


 Thanks for joining me and the team.
Please leave me a lil bit of loving in the form of a comment
Have a Great Day, hopefully it involves scrapbooking.
Cheers Shaz

Saturday 15 January 2022

One Sheet Wonder Note Cards and Gift Box


Welcome to SAB/Mini Fun Day showcasing Jan-Jun Mini Catalogue and SAB products.
One Sheet Wonder Note Cards and Gift Box


Measurements –


A4

LETTER

Cardstock/DSP

Imperial

Metric


Thick Basic White

4 x 7” x 5 ½”

Scored & folded in half

4 x 17.7cm x 13.9cm

Scored & folded in half

As per Imperial Measurements


DSP

As per instructions via Make n Take #5 Video


Basic White

5 x 3 ¾” x 1 ½”

1 x 3” x 2 ¾”

Scraps for Floral & Sentiments

5 x 9.5cm x 3.8cm

1 x 7.6cm x 6.9cm

Scraps for Floral & Sentiments


Supplies –

Stamps

Flowing Flowers, Special Moments


Inks

Merry Merlot


Embellishments

Genial Gems


Ribbon

Crinkle Seam Binding


Punch

2” Circle (Retired)


Dies

Tasteful Labels


Tools

Stampin’ Cut & Emboss Machine – if you have Dies

Paper Trimmer, Bone Folder


Adhesives

Multipurpose Liquid Glue, Tear & Tape


I chose to use Green leaf print from Heart & Home DSP (157928) pg 59 Jan - June Mini


 Firstly cut your DSP as instructed in my video, to create your Gift Box.
see below for the cutting design(original design is from Stamping Jill)
Once you have done the cutting, simply add your adhesive of choice
to the outside fold so that the box and stick both sides to the inside of envelope.
Using the 2" punch cut out the middle of your card pack for ease of inserting cards/envelopes.


Cut the remaining DSP to decorate your Notecards & Envelopes as per my video


 Now to decorate your Basic White Notecards & Envelopes (159232) pg 136 Mini
using the one sheet wonder template cut from DSP.
In the original design Stamping Jill made 4 cards with her DSP
BUT I am making 6 cards, unfortunately only 4 cards and envelopes will fit in the box.

I used a variety of the stamped images from Flowing Flowers (157880) to decorate my cards,
using Merry Merlot Stamp Pad (147112) I let the stamp showcase
it's beauty with simple stamping design.
I used Tasteful Labels Dies (152886) to cut my sentiments with
Mini Stampin Cut & Emboss machine (150673)

See photos below to see how I stamped my cards.
I limited my dimension on these cards as you don't have much room in the box.
The cards I created firstly I used dimensionals on the sentiments BUT
in the video I just used glue to adhere the sentiments to the cards.
I used
Genial Gems (
155500) to decorate the cards


On the 2 extra cards and the belly band for the box
I used some
Crinkled Seam Binding Ribbon (151326)


To create your belly band for the outside of your box gently pinch your 1" strip
all the way around your box making sure that it is not too tight so it slides easily over box
Adhere the 2 ends together and decorate the front of your band.
I used Special Moments (158081) FREE SAB product with $180 spend from any catalogue
to add the sentiment to the front and then I stamped a large floral image which I fussy cut.


Hope you like my project that I created for SAB/Mini Fun Day using all the
BEAUTIFUL products from the BRAND NEW Mini Catalogue and SAB products.
Thanks for following World Card Making Group and my Blog.
Please leave me some Lovin' in the form of a comment here, I appreciate you visiting.
Cheers Shaz