Thursday 19 July 2018

Scrapbooking Global Sketch Blog Hop July 2018


Welcome to Scrapbooking Global's Sketch Blog Hop for July,
You will be a part of something very special this month.
As well our 6 Creative Design Team Members 


We have 24 Scrapbooking Global members hopping for the first time.
This Month Danielle Bennenk chose our theme and isn't it a great sketch.
I cannot wait to see all the different designs from this sketch.
You may have just joined me from Sara Levin's Blog
Sara will have something pretty special, she always does.

I have kept my layout very simple, just like the sketch.
I used Delightfully Detailed Memories and More Card Pack,
pg 195 of the Annual Catalogue.
As you can see there is a variety of cards and sticker sheets and pre printed titles.


These products are created especially for our photo pocket pages.
I have been using these particular products more for cards
and as part of my Scrapbooking Layouts, they are just so versatile.
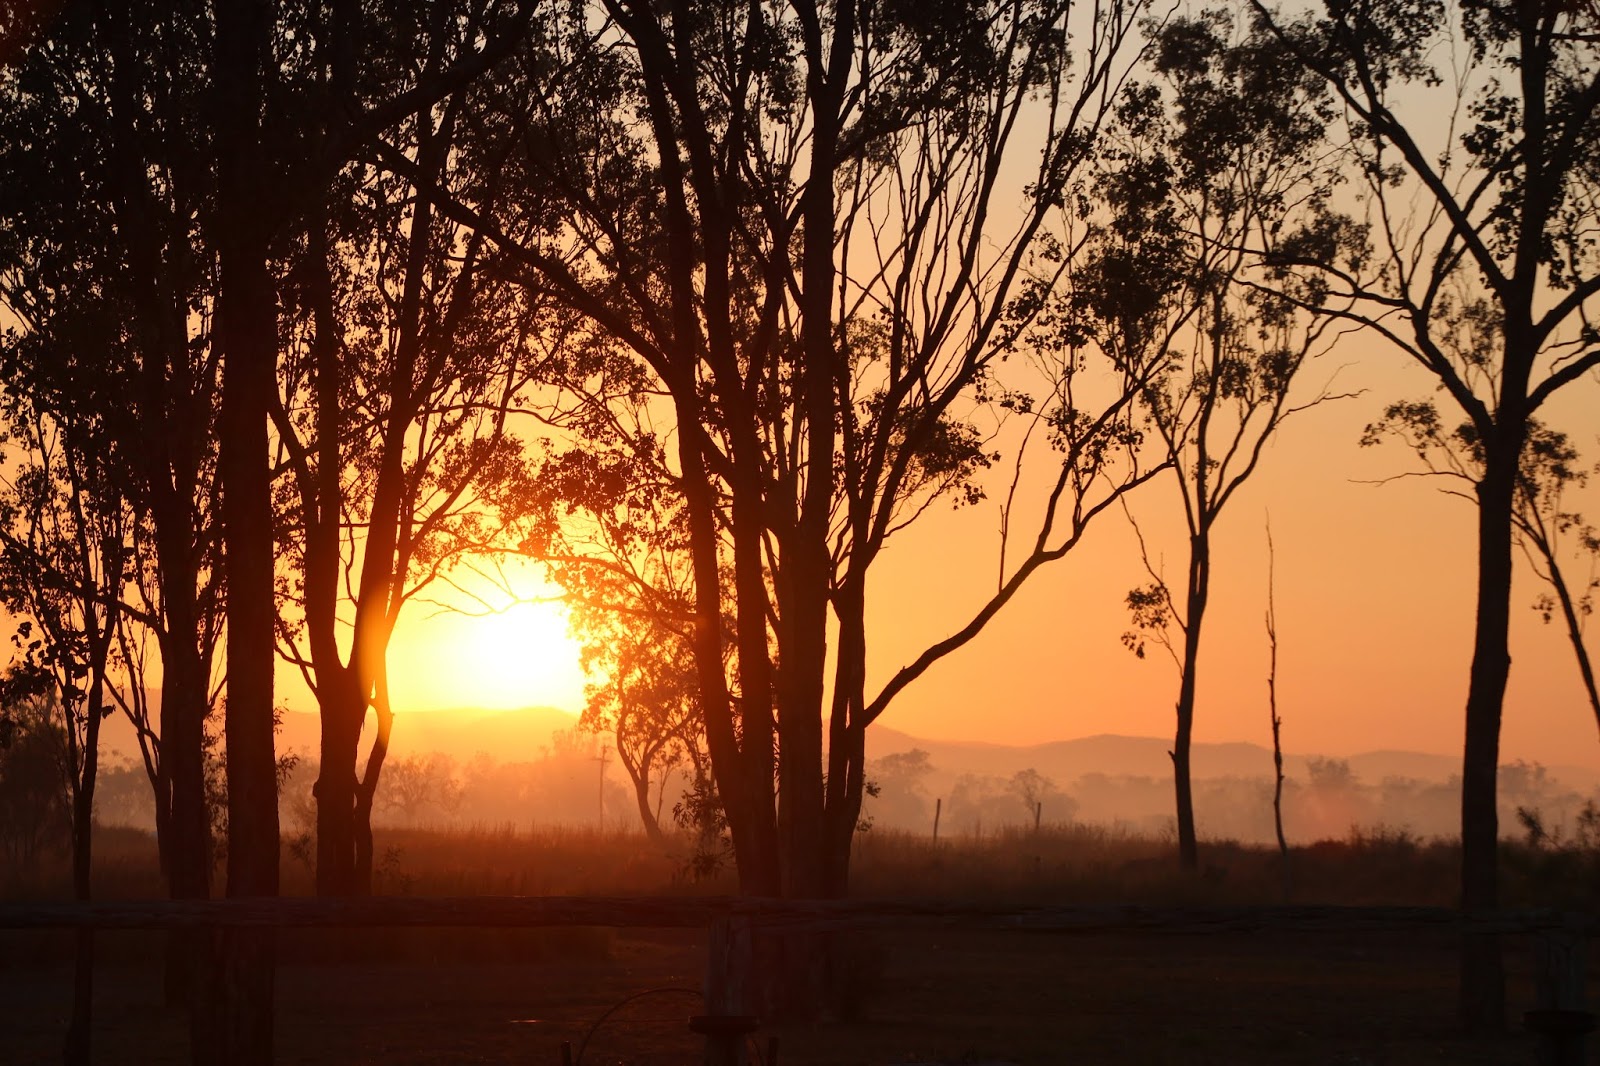
As I have scrapped photos from this occasion before see at the bottom of this post.

I wanted to create a Title Page look page.
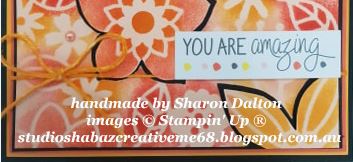
So I used 5 different sized cards and laser cut speciality cards.
I had to cut them down BUT that is the beauty of these cards.
I cut the top off of this one and used it on another card on this layout.


Such a gorgeous colour this card in Grapefruit Grove matches the backdrop.

There are also journalling cards throughout the pack too.
So makes it easy to journal on your layout.


I also used a new punch that Stampin' Up! created to match this range...
It is called the Detailed Trio Punch.
It is has a corner rounder, an eyelet to run your ribbon through
and the one I used has the 3 punched teardrops and small dot.


I punched these in each corner of my layout
and then added some Mint Macaron punched out pieces back in the corners.
You could have also just added a piece of cardstock behind the black background.
 

Here is the completed layout, as I said it is very simple staying true to the Sketch.

Up next is Danielle Bennenk with her design for this Sketch.
Thank you Danielle for your Blog Hop Theme for July.
Next month we have another theme for you to join us on the 16th August...
Check Scrapbooking Global on August 1 for more details.


Thanks for following my blog, please continue on the rest of the hop participants.
Please leave some love in the comment box below
and I will in turn return the favour to you <3
Hope your day was AWESOME  <3

Cheers Shaz


If you need a Demonstrator here in Australia, I am your girl.
All products can be brought through my
online store.
All purchases over $50 will receive a FREE gift from me
Please use hostess code
6FJKRK6B
If you happen to order over $250 please do not use the hostess code
    as you will receive 10% of sales to spend as hostess rewards.  

 All Products used to create this project
Delightfully Detailed Memories & More Card Pack - 147038

Detailed Trio Punch - 146320
Mint Macaron Cardstock - 138344

Sunday 15 July 2018

Scrapbook Sunday Blog Hop July - Designer's Choice


Welcome to Scrapbook Sunday Blog Hop July - Designer's Choice.

This week I have been very sick, so I am sorry for the lack of
photos and details...
I will be back with those details, my apologies

My layout this week is CASED from the equally talented Demo's
Jacque Williams NZ  and Paula Dobson NZ Artisan


Here are some photos of the embellishments I used


I changed a few things on this layout after the Blog Hop went 'LIVE'
see if you can spot the difference


I used Twinkle, Twinkle Designer Series Paper, Flirty Flamingo Cardstock,
Flirty Flamingo Classic Stampin Pad, Healing Hugs,
Wood Words Stamp Set, Wood Crate Framelits Dies, Coloured Doiles,
Ruffled Textured Impressions Embossing Folder
Share What You Love Artisan Pearls, Share What You Love Embellishment Kit,
Polka Dot Tulle Ribbon, Big Plans Memories & More Card Pack.
 

Retired Sending Love Embellishments, Retired Ticket Tear Border Punch,
Retired Touches of Nature Elements.

AS YOU CAN PROBABLY SEE I CHANGED THE FLOWER
To create the flower I used the Baby Wipe Technique, fold a baby wipe in quarters
add a few different drops of Classic Stampin' Ink Refill.


Up next is Charlet Mallett

http://www.painted-orange.com/charletswebsite/2018/scrapbooksunday/july

Thanks for following my blog, please leave me some love
in the comment box below and I will in turn return the favour to you <3
Hope your day was AWESOME  <3

Cheers Shaz

ESAD Designer Series Paper Blog Hop


Welcome to the ESAD Designer Series Paper Blog Hop,
today is all about featuring Stampin' Up!'s Gorgeous DSP
Great promotion on at the moment Buy 3 Get 1 FREE.
Have you taken advantage of it yet?


19 Members of ESAD are hopping today, what is ESAD you ask?
ESAD is Australian and New Zealand Demonstrators who are part of FB group.
I am sure that there will be some TRULY AMAZING creations...


I used Petal Promenade Designer Series Paper, 
it is created by Photographic floral designs.
These papers have marble designs, and textured appearance on the other side.
There is also trimmable elements which I have used as frames and
journalling card.


It matched my Daughter's Bridal Shower photos perfectly.
So I created a Double Page Layout...with lots of photos.
Here is the first page


I used Berry Burst as my base for my double page,
then used
Petal Pink and Mossy Meadow Cardstock
for the mats which complimented the Floral DSP.
 
Here is the 2nd page.
I had to use paper clips to hold the photo down to take the photo.


In the next photo you see how many photos I added to this page...
AND I even wrote some journalling!!!

Now the complete Double Page Layout...

I didn't use very much DSP BUT I sure love the range of Designer Series Papers
that were released in the latest annual catalogue

Up next is Kim Oliver, she is so creative and I cannot wait to see what she has designed.
https://kocreationscards.blogspot.com/2018/07/esad-designer-series-paper-buy-3-get-1.html

Blog hop participant list:


Thanks for following my blog, please leave me some love
in the comment box below and I will in turn return the favour to you <3
Hope your day was AWESOME  <3

Cheers Shaz
 

Friday 13 July 2018

Paper Adventures Blog Hop - Photo Inspiration


 Welcome to Paper Adventures Team Blog Hop
I was invited by the lovely Kelly Kent to be a guest designer this month.
So excited to be joining Kelly and her team for this HOP.
Kelly's team are
mostly from WA (Bunbury & Busselton), her team has grown over the past 5 years to what it is today...

Without further ado...This months hop is a photo inspiration.


My brain went into overdrive when I saw this photo,
Siobhan Fitzsimmons this photo is just STUNNING!!!!

Firstly I chose all the Stampin' Up! colours in the photo, who else thinks about
colours only by Stampin' Up! colour palette these days?
Poppy Parade, Flirty Flamingo, Calypso Coral, Petal Pink,
Mango Melody, So Saffron, Crushed Curry and Basic Black.
Have I missed any???


Starting with a piece of Delightfully Detailed Laser-cut Specialty Paper.
Isn't it just STUNNING? Love that it has whole sheets as well as
distinct patterns with beautiful designs.
So many ways to use this Vanilla or White sheets.
I have used a full sheet here on this layout
AND I have also created some cards with the other designs,
this card for Kelly's Birthday Blog Hop


I used Daubers in all the matching colours to colour in the design.
I started with the darkest colours first then started gently colouring the laser-cut paper
on a piece of Petal Pink Cardstock, sorry I forgot to take a progress picture.

I just held the piece over my cardstock trying not to move it too much - BUT you could Washi tape it down so it doesn't move as your are colouring with the daubers


When you remove the laser-cut paper you are left with the shadowed
piece of Petal Pink cardstock... So pretty RIGHT??


Save the laser-cut piece for the next card.
Next I chose to cut out the main larger flowers so that I pop them up on this piece 
 to add some dimension to the card. I popped the cardstock onto some black cardstock.
Then I cut those flowers slightly smaller so that you can see the black background
behind them...


Next I placed some Mini Stampin' Dimensionals behind the flowers
stuck them to the black background.
Next I grabbed some Whisper White Bakers Twine and used a Dauber to change
the white twine to Mango Melody twine.


Wrapped the twine around the card and made a separate bow to place on top.
 

Diecut 2 bees from Basic Black Cardstock with the Detailed Dragonfly  Thinlits Dies.
I added some Crushed Curry behind the body of the bee and added dimensionals between
the 2 sets of wings to make it more life like.

Next I added 2 more mats on my card behind the black
Flirty Flamingo and the other in Mango Melody.
BUT if you don't know me, I am a bit of a paper saver for other projects.
I cut away the excess that is just going to be stuck together - see photo


I struggled to find the correct sentiment, then I remembered
that I had Big Plans Memories and More Card Pack with sheets of stickers.
Next I added some of the Share What You Love Artisan Pearls to my card.
I used Basic Black cardstock as my card base cut at 10.5cm x 29.7cm


With the leftover Laser-cut paper I stuck it very carefully to
Petal Pink Cardstock.

HOW TO ADD GLUE TO LASER CUT PAPER
I use a cotton tip dipped in Multipurpose Liguid Glue and lightly
add glue to the back of the paper, then carefully place down on your card.
If you happen to miss some you can easily life it with a knife and use your
cotton tip to add more glue...see photo


The Beautiful detail of this card was already created so it was a very quick card
to make...REMEMBER that cardstock that I saved!!!
I used the BigShot and Celebrate You Thinlits Dies to create my sentiment.
Cut 1 'Amazing' from Flirty Flamingo, 2 Amazing from Mango Melody
and 1 Amazing from Basic Black as well as a YOU in Basic Black too.
Add the finished word Amazing to the card then add You on top of that.
Added some more of those gorgeous pearls AND this card was finished.


I was going to create a layout with this sunset photo for this Blog Hop.
I may still use these same colours and create a layout yet!!!

BUT being sick since last Saturday and still not much better
I decided to go with a card instead. 


Up next is the Beautifully Talented Kelly with what I am sure
will be totally AMAZING creation using inspiration from Siobhan's photo.
Thanks for asking me to join you on your team's monthly Hop Kelly,
it truly is my pleasure to create something special <3

https://mypapercraftjourney.com/2018/07/13/paper-adventures-team-blog-hop-photo-inspiration/

Thanks for following my blog, please leave me some love
in the comment box below and I will in turn return the favour to you <3
Hope your day was AWESOME  <3

Cheers Shaz

Sunday 8 July 2018

I Love You To The Moon And Back


This layout was made for a friend who has just had twin boys.
Krissy and Andrew truly have been blessed with these 2.
As soon as Andrew posted this photo of his wife with his sons,
I knew immediately that I MUST scrapbook this precious photo.
(So I stole it off FB without even asking)

In my previous post here I created a canvas with the same suite as I used here,
for Krissy and Andrew BUT she has not seen it yet (unless she has read this post)

Twinkle Twinkle
has the most gorgeous DSP and it is just perfect.I fussy cut out all the stars, moon and the heart and I stitched them to the page.
Then I tore up some white tissue (you know the kind you wrap presents in)
and created a circular shape to create the moon outline.
I then stitched it to the DSP too...I used glue dots to stick it down.


Next I printed out the photo of Krissy, Ethan and Hudson so
I could mount it on more of the beautiful DSP.
I used a distressing tool to rub back the edges of the frames and
then proceeded to stitch around them.
Lastly I add the photo and then covered the majority of the photo
with a piece of paper to protect it from the sewing machine foot then stitched all around.
 

Such a precious moment captured FOREVER <3 First Cuddles from Mummy <3

Next I added all the Silver thread around the surface of the moon <3
This was also done using Glue Dots. That thread is so fine!!!
Just gave the moon the pop I wanted.

Next I stamped the larger heart on the already printed pink heart with Night of Navy.
Popped it up with Stampin' Dimensionals.
Then I stamped "love you more than all the stars" and added more
dimensionals and popped it right on the corner of the photo.

To finish the layout off I stamped all the letters for
"Love You To The Moon And Back" out with Lined Alphabet
and Night of Navy, then fussy cut all of them for my title.
I used Foam Adhesive Strips to mount the letters around the moon shape.

Now that I have showed Krissy and asked permission to post photos of her lil men
all over the world I will show you the finished layout.


I have added this layout to my Facebook group Scrapbooking Global - Stampin' Up into Danielle Bennenk' s July Challenge Album - Textures

If you are not yet a member of this group please add yourself as a member
we have lots of exciting things happening over on the page.
We just announced the 6 Creative Design Team members,
each designer creates a Challenge and Blog Hop theme.
Come on over and see what we are all up to.
Cannot wait to see you there <3

 
If you need a Demonstrator here in Australia, I am your girl.
All products can be brought through my
online store.
All purchases over $50 will receive a FREE gift from me
Please use hostess code
6FJKRK6B
If you happen to order over $250 please do not use the hostess code
    as you will receive 10% of sales to spend as hostess rewards.  

 
 All Products used to create this project
Twinkle Twinkle Designer Series Paper - 146284
 Little Twinkle Stamp Set - 146452
Night of Navy Classic Stampin' Pad - 147110
Stampin' Dimensionals - 104430
Foam Adhesive Strips - 141825 
Mini Glue Dots  - 103683
Lined Alphabet Stamp Set - 145908 

Thanks for following my blog, please leave me some love
in the comment box below and I will in turn return the favour to you <3
Hope your day was AWESOME  <3

Cheers Shaz