Thursday, 10 July 2025

Colour INKspiration Challenge - #ci191 - Thankful Garden


A NEW fortnight, A New Challenge.
Love the fact that we get to showcase 
Gorgeous Colour Combinations
that we probably wouldn't usually create with.
Are you a member of Colour INKspiration Challenge group over on FB,
if not 
do yourself a favour and come over and ask to join the group. 
You will have to answer a couple of questions, that helps us keep the spammers away.


Here is the NEW challenge colours, these colours are so lovely together. #ci191
What a GORGEOUS photo that Nicole Wilson picked for us to be inspired
by from this web address


The card that I created just happened, I searched the internet for a technique
that I could use multiple colours with... AND of course Google to the rescue.

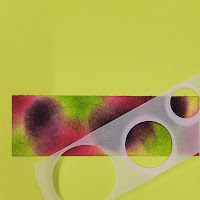
Bokeh - Bokeh is a term in photography where the image is out of focus or blurry appearance of circles within the image. BUT in cardmaking it is where you use circle stencils to create overlapping effect over a background colour.
I have used multiple circle dies from Stylish Shapes Dies diecut out of vellum and I also used 
some retired circle punches to create different sized to create variety.


So to create this background, I used Fluid 100 Watercolour paper.
 You really should add all the ink colours with a blending brush or dauber a day or so in advance so that it is completely dry.  Because once we start adding the Craft white ink (which is a very thick ink) the colours blend  
BUT I didn't do that, Did I?
So my white ink is a little pinky rather than white.

So this is step by step with the 4 colours from this challenge #ci191
I added the lighter colours first starting with Lemon Lime Twist, then Granny Apple Green not to muddy up my blending brushes too much.  Next I used Berry Burst and then lastly the Blackberry Bliss as it was the darkest of all the colours.

So you can see how the Bokeh effect looks on this coloured background, 
It's such a cool technique.


So I created that piece first and then I designed my card.
I decided to use a new set of stencils to me, Thankful Garden Decorative Masks
which have a co-ordinating Thankful Garden Bundle which I only used the Stamp for the Hydrangea and Dies for the leaves.


This technique which I am sure has a name BUT I don't know what it is.
I started off by using the White Craft Ink directly with a Blending Brush or Dauber onto the stencil/mask of leaves (4) and blocking out the Berry Burst cardstock then I next added s


tencil/mask of leaf (5) and added the next layer of white ink.
So after finishing with stencil/mask Leaves (4 &5) using the White Craft Ink
I used Lemon Lime Twist 
on a dauber and coloured in the stencil/mask Leaf (5)


Next layer is the actual stencil/mask Hydrangea flower (1) adding White Craft Ink to the solid image with a blending brush or a dauber over the Berry Burst cardstock.
There are 3 stencil/mask to create this flower so I just kept adding the layers
of White Craft Ink with the dauber to create the depth of the flower.
So after finishing with 
stencil/mask Hydrangea flower (2 & 3) using the White Craft Ink
I used Blackberry Bliss 
on a dauber and coloured in the stencil/mask Hydrangea flower (3)


Lastly I used a retired product - Stamparatus (that I will never ever get rid of)
to stamp 
directly over the image with the photopolymer stamp to create the outline of the Hydrangea flower.  This is just a little bit right of the image BUT the one I created for the 
card is perfectly aligned.  The colouring creates depth within the image.
Die cut out with the co-ordinating Dies that you can purchase with this bundle


Berry Burst Card Base - 8 1/4" x 5 1/2"
Blackberry Bliss Layer 
Embossed with Glass & Garden EF - 5 1/4" x 3 1/8"  also added on this layer is Gold splatters these are from the Metallic Texture Rub-Ons. 
Granny Apple Green Layer - 5 1/16" x 1 11/16"
Bokeh Layer - 5" x 1 5/8"
Hydrangea Flower stencil/mask Layer - 
4 1/4" x 3 1/4" die cut out with Dies
Lemon Lime Twist Layer - Leaves die cut with Dies and adding some Granny Apple Green Ink to add some defination to the veins.
Basic White Cardstock - Sentiment - 2 1/4" x 1/2"
Basic White Cardstock Layer - Insert - 5 3/8" x 4"
Retired Gold Thread used for the Bow.


So we would LOVE to have you create a project for this challenge #ci191.  All the details are over on the FB group, so pop over there and check out the inspiration from The Colour INKspiration Crew

All Supplies used in this project can be purchased in my Stampin' Up! ® online store

I want to say a HUGE THANKS to you who visit my blog and comment it really means a lot to me.  I really do appreciate you leaving me some Lovin' in the form of a comment.

Being CREATIVE is not a hobby it is a way of life

Cheers Shaz


Wednesday, 25 June 2025

Colour INKspiration Challenge - #ci190 - Basic Biege - Crumb Cake and Cajun Craze


A NEW fortnight, A New Challenge. Love the fact that we get to showcase
Gorgeous Colour Combinations that we probably wouldn't usually create with.
Are you a member of Colour INKspiration Challenge group over on FB, if not
do yourself a favour and come over and ask to join the group. 
You will have to answer a couple of questions, that helps us keep the spammers away.


Here is the NEW challenge colours, t
hese colours are so lovely together. #ci190 
 I must admit one of them isn't a FAVOURITE of mine.
BUT it is the star of my card.


You know in my mind I had a completely different idea in mind,
BUT that is what I LOVE about creativity it takes you on an adventure.
Last night I sat with a scrapbooking layout on my desk and I got nothing, a blank canvas.
I got nowhere with my creativity, despite having loads of time and all the products that I have used on this card..... I still may do a scrapbooking layout yet!!


So I had seen a card design somewhere on the internet a few days ago and I thought I might give it a go, BUT I didn't take a photo or a screenshot of it.  I have no idea what the card is called.  So going by memory this is what I think it looks like. 
Totally plucking my own measurements out of the sky here.

Cajun Craze Base Card - 8 1/4" x  5 3/4"
Basic Biege Insert - 8" x 5 5/8" score at 3 7/8" and 5 7/8"
Basic Biege Country Woods DSP Insert 5 1/2" x 3 3/4"
2" Circle of Crumb Cake
Scrap of 
Basic Biege Woven Textures DSP for a Fern Leaf

Card Front
Basic Biege Country Woods DSP Insert 5 3/4" x 4
Vellum Cardstock (Retired)  Embossed with Sunflower 3D EF
Scrap of Basic Biege Woven Textures DSP for a Fern Leaf
Basic Biege Scrap for the Floral Bloom
Vellum Cardstock for the Floral Bloom
Window Sheet for the 2 1/4' Circle
Cajun Craze Scrap for a 2 1/4" Circle to cut a 2" Ring out of
Basic Biege for the Flower from the Floral Bloom


I stamped the Floral Bloom from You are Remarkable with 2nd generational Crumb Cake onto Basic Biege then added the leaf details with Crumb Cake then I also stamped it offset with Basic Biege to give the shading look to the leaves.
Next I stamped the Solid image for the flower with 2nd generational Cajun Craze Ink.
Then I stamped the flower detail in full strength Cajun Craze.


The hardest part of this card was the actual fussy cutting of the Floral Bloom twice, 
once from Basic Biege and the 2nd one that I heat embossed on the retired Vellum.
Then because once I had finished the card I realised when you opened it you could
see the dimensionals on the back of the window sheet. 

So I then stamped the floral image onto a piece of window sheet in 2nd generational ink and then stamped the detail image of the flower in 2nd generational ink over the top and then added a piece of scrap paper over the top and I got the reverse image to fussy cut to cover up the dimensionals.  Look inside the window to see the reverse image.


Before I die cut the fern leaves from the Woven Textures DSP I added a variety of shades of
Crumb Cake and Cajun Craze randomly over the piece of DSP with a blending brush.

AND I used Vellum Cardstock to create the added dimension on the front of the card with the Sunflowers 3D Embossing Folder.  Next I added some Cajun Craze Ink to the insides of the sunflowers.


The sentiments on the inside of the card are from Extraordinary Flora (With Love)
Stamped on Crumb Cake 2" circle with 2nd generational stamp from Elements of Text.

The Happy Birthday comes from a Upcoming Online Exclusive due out in July
called Charming Day stamped directly with Cajun Craze Ink and the flower in the corner is 
done the same way that I did the front flowers.

The Bling that I chose to use is Strawberry Slush and Pretty In Pink Gems, 
somehow there were clear gems in there with gold sparkles inside.

So we would LOVE to have you create a project for this challenge #ci190.
All the details are over on the FB group, so pop over there and check out the inspiration from 
The Colour INKspiration Crew

All Supplies used in this project can be purchased in my Stampin' Up! ® online store


I want to say a HUGE THANKS to you who visit my blog and comment it really means a lot to me.  I really do appreciate you leaving me some Lovin' in the form of a comment.
Being CREATIVE is not a hobby it is a way of life

Cheers Shaz


/

Thursday, 19 June 2025

Scrapbooking Global Blog Hop - June 19th - Alternative Scrapbooking Workshop Kit.


Welcome to Scrapbooking Global - Stampin' Up! Blog Hop - June 19th 2025

This month's theme is to create an Alternative Scrapbooking Workshop Layout with any Scrapbooking Workshop Kit in our Memory Keeping section of the Online Store.
I am this months Creative Design Team Member who chose this theme.

Scrapbooking Global - Stampin' Up! FB group consists of over 11,000 members.
We are a  group demonstrators from all over the world who all LOVE to scrapbook and document their everyday lifestyle for generations to enjoy in the future.

We welcome anyone who wants to be inspired to join in the FUN of a Blog Hop.
We are trying to encourage EVERYONE to join in the HOP's every month.
BUT you don't have to have a blog to participate in these monthly challenges.
You can upload a photo of layout to the Album of the Month after 2pm AEST on June 19th.
You can JOIN Scrapbooking Global - Stampin' Up! FB group here
You MUST answer a couple of questions to be allowed into the group, as per the rules.


Stampin' Up! have created so many AMAZING Scrapbooking Workshop kits for you 
to create with whether you are a beginning scrapbooker or a seasoned pro.
You have enough products in your Workshop Kit to create the 6 layout with full instructions.
PLUS you will have enough to
 create with the leftover products to be able to at least create 2 more layouts with just a couple of extra pieces of Cardstock/Designer Series Paper

So this theme that I have chosen is just another way to create additional layouts. 
I have chosen to show you how I used the positive of this shape that comes in your workshop kit to create 2 half pieces with Two-Toned Cardstock for my layout.  I traced around the shape and then I hand cut the shape from Pretty Peacock Two-Toned Cardstock.


I also used the negative pieces from the push out pre-cut elements to do some stencilling on my layout as I only had 2 of the leaves left from the sheet.


Then I layed the 2 leaves that I had left over and put them back in the die cut and added a small amount of ink with a blending brush.


 I hope you like what I have achieved with some of the leftover pieces from the Workshop Kit


You can shop for this kit and others from this link in my Online Store 


Up next is Cheryl's Blog Cheryl always does a video to show you how she created her layout.
Julia and Sherry created AMAZING alternatives to the workshop kits.


I hope that you enjoy all the different layouts that have been created today.
We will be back again NEXT Month on 17th July with a new challenge for you.
Please be sure to follow the rest of the participants by clicking on the list below.
Hop all the way around and leave some LOVIN' in the form of a comment.


All Supplies used in this project are linked at the end of the post.
These products can be purchased in my Stampin' Up! ® online store

Monday, 10 March 2025

Crafty Collaborations Scrapbook Sunday Blog Hop - Hooray


Sneak Peak


Welcome to the Crafty Collaborations Scrapbook Sunday Blog Hop.  
Crafty Collaborations is a group of Stampin' Up! Demonstrators from throughout the world collaborating together to create scrapbooking layouts who LOVE sharing their creative flair.
There are 5 of us who are joining the hop, so lovely to have lots for you to look at.


You may have joined me from Cheryl's Blog or you may be starting here with me,
Thank you for joining us this month.  We are very excited as this week we head to OnStage (conference) held every year in various locations through out the world.  I will be in Brisbane.

I LOVE not having any theme or challenge for our Crafty Collaborations Blog Hop. 
So this is a very quick layout with some leftover products from Scrapbooking Workshop Kit Wildflower Celebrations and a couple of Two -toned cardstocks that co ordinated with it.

We have had severe thunderstorms here this afternoon so the photos are very light due to the fluorescent lighting in the studio.  AND another one is on the way, I can hear the rumbling in the distance.

This layout as I said was from the left over pieces from the Workshop Kit.
So it is super simple double page layout.  I chose to go with 2 large photos 5" x 7" and 
two 4" x 4" photos as this was created without any photos I have chosen not to add a title or any stamping to indicate what occasion we are celebrating <3 


Here is the double layout using Wildflower Celebrations Scrapbooking Workshop Kit.


I hope you enjoyed how I created this layout...
Follow the rest of the participants by clicking on the list below.
Glad that you could HOP along with us today following the

Crafty Collaborations Scrapbook Sunday Blog Hop.

Up Next is Julia Quinn


I want to say a HUGE THANKS to you who visit my blog and comment it really means a lot to me.  I really do appreciate you leaving me some Lovin' in the form of a comment.

Being CREATIVE is not a hobby it is a way of life
Cheers Shaz

Thursday, 20 February 2025

Scrapbooking Global Blog Hop - Feb 20, 2025 - Sketch


Sneak Peak


Welcome to Scrapbooking Global - Stampin' Up! Blog Hop - Feb 20 2025
This month's theme is a Sketch which our Creative Design Team Member Julia chose.

Scrapbooking Global - Stampin' Up! FB group consists of over 11,000 members.
We are a  group demonstrators from all over the world who all LOVE to scrapbook and document their everyday lifestyle for generations to enjoy in the future.

We welcome anyone who wants to be inspired to join in the FUN of a Blog Hop.
We are trying to encourage EVERYONE to join in the HOP's every month.
BUT you don't have to have a blog to participate in these monthly challenges.
You can upload a photo of layout to the Album of the Month after 2pm AEST on Feb 20th
You can JOIN Scrapbooking Global - Stampin' Up! FB group here.


As I said Julia chose this sketch and our Lovely graphics designer Courtenay created this sketch design for us for the Feb Sketch Challenge

You may have joined me from Sherry's Blog or you are just joining me from my link.

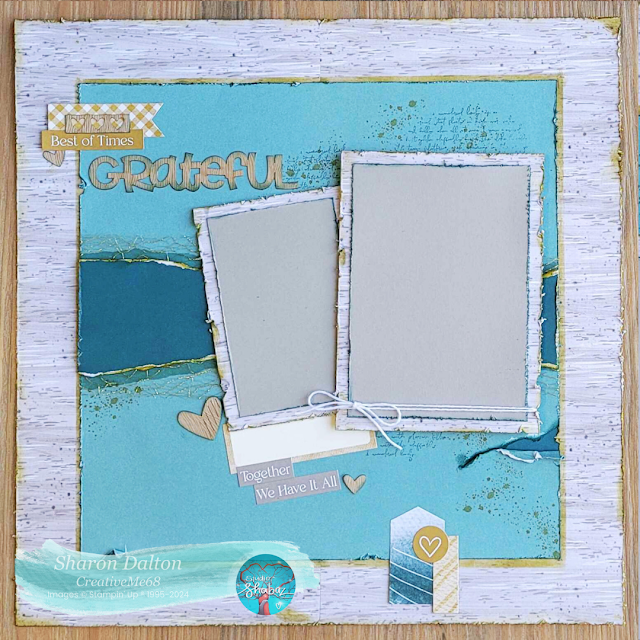
My layout was created using products from the Everyday You and Me Scrapbooking Kit.
I have also included some FREE Sale-A-Bration paper Toadstool Gardens DSP.
Some of the accents/embellishments are from Autumn To Remember Scrapbooking Kit.

As soon as I saw this sketch I knew I would LOVE creating this layout to show you.
I LOVE a bit of grunge as a change from my normal style of scrapbooking.

So the background is the Toadstool Gardens DSP with grunged up edges and Wild Wheat Classic Stampin' Pad ink around the edges and where I knew that my centre piece of two-toned cardstock was going to rest.


As you can see in the sketch there was a torn section across the middle section I chose to 
use two-toned Pretty Peacock cardstock and then adding some of the blending behind on the Lost Lagoon two-toned cardstock to give the depth of perception thinking that it is torn behind as well BUT it isn't!!


The middle section is Lost Lagoon two-toned cardstock which I grunged up and tore some
pieces away and added the Pretty Peacock two-toned cardstock in there.
On this piece I also added some text and dottage in the background 
from Elements of Text Cling Stamp just as you can see in the sketch.


I added some of the Gold Open Weave Trim across the middle as well to add more depth behind the photos not that you can see much of it.


Next I layered up the photographs so that you could see the height between the 2 photos
this allowed for one photo to fit behind the other.  How I do this is I use the grey chipboard backing card that comes with our DSP and I layer it up so that I can create height rather than using lots of dimensionals...


I have finished off the layout with some of the sticker accents/embellishments from
Everyday You and Me Scrapbooking Kit and the Autumn To Remember Chipboard sheets.
Some twine around the photograph to finish it off.

The colours are a bit off due to the extreme sunshine here today...
Not really sure which photos I will put on this layout BUT I am sure that my words
will work with any occasion <3


Up Next is Maz Wood


I hope that you enjoy all the different layouts that have been created today.
We will be back again NEXT Month on 20th March with a new challenge for you.
Please be sure to follow the rest of the participants by clicking on the list below.
Hop all the way around and leave some LOVIN' in the form of a comment.


All Supplies used in this project are linked at the end of the post.
These products can be purchased in my Stampin' Up! ® online store

Basic White 12" Cardstock
6" x 6" Toadstool Gardens DSP
Lost Lagoon Two-toned Cardstock
Pretty Peacock Two-toned Cardstock
Gray Granite Cardstock
Bakers Twine Essentials Pack
Open Weave Trim - Gold
Elements of Text Cling Stamp
Lost Lagoon Classic Stampin' Pad
Pretty Peacock Classic Stampin' Pad
Wild Wheat Classic Stampin' Pad
Accents/Embellishments from Everyday You and Me Scrapbook Kit
and Autumn To Remember


I want to say a HUGE THANKS to you who visit my blog <3 
I really do appreciate you leaving me some Lovin' in the form of a comment.

Being CREATIVE is not a hobby it is a way of life.
Cheers Shaz