
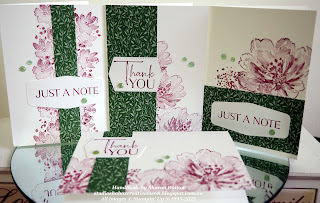

Welcome to SAB/Mini Fun Day showcasing Jan-Jun Mini Catalogue and SAB products.
One Sheet Wonder Note Cards and Gift Box
Measurements –
|
|
A4 |
LETTER |
|
|
Cardstock/DSP |
Imperial |
Metric |
|
|
Thick Basic White |
4 x 7” x 5 ½” Scored & folded in half |
4 x 17.7cm x 13.9cm Scored & folded in half |
As per Imperial Measurements |
|
|
|
|
|
|
DSP |
As per instructions via Make n Take #5 Video |
|
|
|
|
|
|
|
|
Basic White |
5 x 3 ¾” x 1 ½” 1 x 3” x 2 ¾” Scraps for Floral & Sentiments |
5 x 9.5cm x 3.8cm 1 x 7.6cm x 6.9cm Scraps for Floral & Sentiments |
|
Supplies –
|
Stamps |
Flowing Flowers, Special Moments |
|
|
|
|
Inks |
Merry Merlot |
|
|
|
|
Embellishments |
Genial Gems |
|
|
|
|
Ribbon |
Crinkle Seam Binding |
|
|
|
|
Punch |
2” Circle (Retired) |
|
|
|
|
Dies |
Tasteful Labels |
|
|
|
|
Tools |
Stampin’ Cut & Emboss Machine – if you have Dies Paper Trimmer, Bone Folder |
|
|
|
|
Adhesives |
I chose to use Green leaf print from Heart & Home DSP (157928) pg 59 Jan - June Mini

Firstly cut your DSP as instructed in my video, to create your Gift Box.
see below for the cutting design(original design is from Stamping Jill)
Once you have done the cutting, simply add your adhesive of choice
to the outside fold so that the box and stick both sides to the inside of envelope.
Using the 2" punch cut out the middle of your card pack for ease of inserting cards/envelopes.


Now to decorate your Basic White Notecards & Envelopes (159232) pg 136 Mini
using the one sheet wonder template cut from DSP.
In the original design Stamping Jill made 4 cards with her DSP
BUT I am making 6 cards, unfortunately only 4 cards and envelopes will fit in the box.
I used a variety of the stamped images from Flowing Flowers (157880) to decorate my cards,
using Merry Merlot Stamp Pad (147112) I let the stamp showcase
it's beauty with simple stamping design.
I used Tasteful Labels Dies (152886) to cut my sentiments with
Mini Stampin Cut & Emboss machine (150673)
See photos below to see how I stamped my cards.
I limited my dimension on these cards as you don't have much room in the box.
The cards I created firstly I used dimensionals on the sentiments BUT
in the video I just used glue to adhere the sentiments to the cards.
I used Genial Gems (155500) to decorate the cards


On the 2 extra cards and the belly band for the box
I used some Crinkled Seam Binding Ribbon (151326)


To create your belly band for the outside of your box gently pinch your 1" strip
all the way around your box making sure that it is not too tight so it slides easily over box
Adhere the 2 ends together and decorate the front of your band.
I used Special Moments (158081) FREE SAB product with $180 spend from any catalogue
to add the sentiment to the front and then I stamped a large floral image which I fussy cut.

Hope you like my project that I created for SAB/Mini Fun Day using all the
BEAUTIFUL products from the BRAND NEW Mini Catalogue and SAB products.
Thanks for following World Card Making Group and my Blog.
Please leave me some Lovin' in the form of a comment here, I appreciate you visiting.
Cheers Shaz


