 |
A NEW fortnight, A New Challenge.
Love the fact that we get to showcase Gorgeous Colour Combinations
that we probably wouldn't usually create with.
Are you a member of Colour INKspiration Challenge group over on FB,
if not do yourself a favour and come over and ask to join the group.
You will have to answer a couple of questions, that helps us keep the spammers away.
Here is the NEW challenge colours, these colours are so lovely together. #ci191
What a GORGEOUS photo that Nicole Wilson picked for us to be inspired
by from this web address
The card that I created just happened, I searched the internet for a technique
that I could use multiple colours with... AND of course Google to the rescue.
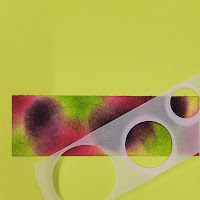
Bokeh - Bokeh is a term in photography where the image is out of focus or blurry appearance of circles within the image. BUT in cardmaking it is where you use circle stencils to create overlapping effect over a background colour.
I have used multiple circle dies from Stylish Shapes Dies diecut out of vellum and I also used
some retired circle punches to create different sized to create variety.
So to create this background, I used Fluid 100 Watercolour paper.
You really should add all the ink colours with a blending brush or dauber a day or so in advance so that it is completely dry. Because once we start adding the Craft white ink (which is a very thick ink) the colours blend BUT I didn't do that, Did I?
So my white ink is a little pinky rather than white.
So this is step by step with the 4 colours from this challenge #ci191
I added the lighter colours first starting with Lemon Lime Twist, then Granny Apple Green not to muddy up my blending brushes too much. Next I used Berry Burst and then lastly the Blackberry Bliss as it was the darkest of all the colours.
It's such a cool technique.
I decided to use a new set of stencils to me, Thankful Garden Decorative Masks
which have a co-ordinating Thankful Garden Bundle which I only used the Stamp for the Hydrangea and Dies for the leaves.

This technique which I am sure has a name BUT I don't know what it is.
I started off by using the White Craft Ink directly with a Blending Brush or Dauber onto the stencil/mask of leaves (4) and blocking out the Berry Burst cardstock then I next added s
tencil/mask of leaf (5) and added the next layer of white ink.
So after finishing with stencil/mask Leaves (4 &5) using the White Craft Ink
I used Lemon Lime Twist on a dauber and coloured in the stencil/mask Leaf (5)


Next layer is the actual stencil/mask Hydrangea flower (1) adding White Craft Ink to the solid image with a blending brush or a dauber over the Berry Burst cardstock.
There are 3 stencil/mask to create this flower so I just kept adding the layers
of White Craft Ink with the dauber to create the depth of the flower.
So after finishing with stencil/mask Hydrangea flower (2 & 3) using the White Craft Ink
I used Blackberry Bliss on a dauber and coloured in the stencil/mask Hydrangea flower (3)
Lastly I used a retired product - Stamparatus (that I will never ever get rid of)
to stamp directly over the image with the photopolymer stamp to create the outline of the Hydrangea flower. This is just a little bit right of the image BUT the one I created for the
card is perfectly aligned. The colouring creates depth within the image.
Die cut out with the co-ordinating Dies that you can purchase with this bundle
Berry Burst Card Base - 8 1/4" x 5 1/2"
Blackberry Bliss Layer Embossed with Glass & Garden EF - 5 1/4" x 3 1/8" also added on this layer is Gold splatters these are from the Metallic Texture Rub-Ons.
Granny Apple Green Layer - 5 1/16" x 1 11/16"
Bokeh Layer - 5" x 1 5/8"
Hydrangea Flower stencil/mask Layer - 4 1/4" x 3 1/4" die cut out with Dies
Lemon Lime Twist Layer - Leaves die cut with Dies and adding some Granny Apple Green Ink to add some defination to the veins.
Basic White Cardstock - Sentiment - 2 1/4" x 1/2"
Basic White Cardstock Layer - Insert - 5 3/8" x 4"
Retired Gold Thread used for the Bow.
So we would LOVE to have you create a project for this challenge #ci191. All the details are over on the FB group, so pop over there and check out the inspiration from The Colour INKspiration Crew
All Supplies used in this project can be purchased in my Stampin' Up! ® online store
I want to say a HUGE THANKS to you who visit my blog and comment it really means a lot to me. I really do appreciate you leaving me some Lovin' in the form of a comment.
Being CREATIVE is not a hobby it is a way of life
Cheers Shaz


So many great techniques here Sharon. The bokeh panel is amazing, and I love how you have included White Craft ink in the stencilling. Great idea. xxx
ReplyDelete