


Welcome to We Create Halloween Blog Hop, the first day of October
where is this year going....So Halloween at the end of the month.
Halloween is not something that I celebrate here in Australia, BUT
I know many do throughout the world...
AND you will see with the participants from all over the world here hopping today
how many actually do celebrate Halloween....
You may have started with me or you are starting with Kris Kilkenny
items I brought out of the Annual Catalogue.
Cannot wait to see what she designs...

So I really like the fact that with this Blog Hop we get
to pick the Stampin' Up! set or suite we want to showcase....
As soon as I saw the holiday catalogue, I knew that I LOVED the Owl die from
Night Owl Thinlits Dies...BUT it wasn't something that I would buy.
Luckily for me one of my team members was in LOVE with this bundle.
She allowed me to borrow it today to create this card and tea light candle holder.

which Bronwyn Eastley has a tutorial for sale on her blog.
These tutorials are currently on sale so I brought it and made my versions.
So out of this idea my project was born, I changed it a little bit.
I didn't have any correct sized chocolates here that fit the box.
So my first design became a card.

out of the Night of Navy cardstock.
Next I cut a slightly smaller than 3" square of Twinkle Twinkle DSP
and cut the same sized circle out of it and layered it on the Night of Navy cardstock.
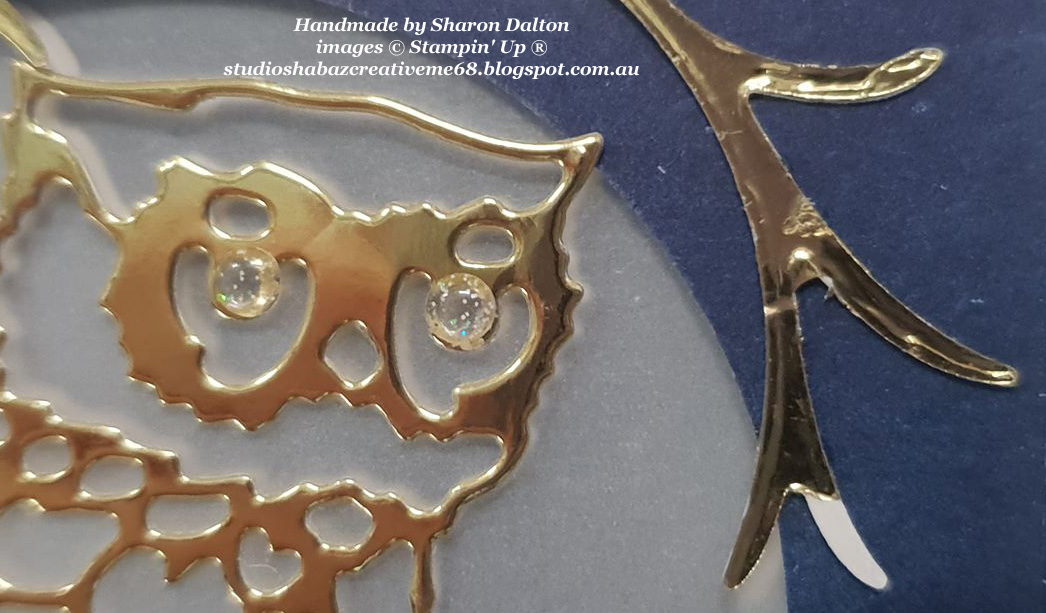
Then I layed the Gold foil branch down over the circle and only glued
where it touched the cardstock... Next I added glue dots to the
gold foil owl in places that they really wouldn't be seen.
Next I added the Vellum layer on the inside of box and stuck the second
branch and owl to that piece. Adding glue in exactly the same spots
so they wouldn't be seen through either side.

If you are wondering how I got the owl and the branch to be in reverse,
I cut one set the correct way through the Big Shot.
Then once I had done that I turned the Gold Foil over and cut them
out of the back of the foil...
PLEASE NOTE this recommendation
Use a fairly new set of Big Shot Plates so that you don't get
previous cut lines on your gold foil.


all the details from the inside of your owls.
Then I added the sentiment from All The Good Things Stamp Set,
pretty appropriate for the OWL I felt!
I layered 3 levels inside the circle with dimensionals
Gold Foil, Twinkle Twinkle DSP and White CS


BUT I wasn't satisfied to stop there...
I saw something else that could be made out of this Christmas Chocolate holder.
A Tea Light Candle Holder with NON flame tea light of course. Did you see it too?
Sooo I flipped the tutorial and used the same dimensions to
create my Tea Light Candle Holder.
Created all the elements again and just changed the way it sat on the table.

I used used the shaped die from the set to create the
HappyOWLween Sentiment...
Used 2 different lettering styles to create the words.
HappyOWLween Sentiment...
Used 2 different lettering styles to create the words.
'Happy' and 'Ween' were created using Make A Difference Stamp Set
'OWL' was created using Labeler Alphabet Stamp Set
'OWL' was created using Labeler Alphabet Stamp Set

You could add Frosted and Epoxy Droplets for the Owls eyes

Very happy with how it turned out!!! EXCEPT for the dodgy photo.
I was trying to rush to take the photo as not to catch the paper on fire.
Don't do as I do, Do as I say...Use a flameless candle
BUT I didn't have one of them either.
Well I hope you liked my projects, please leave me a comment below
as I LOVE hearing what you think... Good or bad!!!
Please make sure you continue the Blog Hop by clicking on the NEXT button
Up next is Anastasia Radloff who is using Farmhouse Christmas...
I am sure her designs will be nothing short of AMAZING.
This is another set that I do not own...So I suppose Anastasia will be an enabler
and force my hand into adding these products to my next order.

Thanks for visiting and leaving me comments...
Until next time Cheers Shaz
Clever idea!
ReplyDeleteThanks so much Libby <3
DeleteCheers Shaz
Amazing project ideas. My favorite is the tea light holder. The owl looks amazing. :)
ReplyDeleteThank you Tricia, My favourite is the tea light holder too <3
DeleteCheers Shaz
How did I miss this die? I love the gold die cuts! This turned out amazing. What a beautiful project. Thanks for sharing.
ReplyDeleteI know sometimes our eyes play tricks on us, that we don't see things in the catalogue Kris.
DeleteI was very happy how it turned out <3
Cheers Shaz
So creative. I love owls and your projects are gorgeous. I love the tips for reversing the image. Guess I am going to have to get some new plates
ReplyDeleteThanks Cheryl, I save a set of plates just for my foil as I like them to look crisp on the top of the foil...
DeleteCheers Shaz
How creative! I love the little tea light holder!
ReplyDeleteThanks Tanya, I hope the recipients likes it too <3
DeleteCheers Shaz
LOVE your version with the owl. Very cool.
ReplyDeleteThe owl one with the light is so soft and pretty! Love the designs!
ReplyDelete