


Welcome to Scrapbooking Global - Stampin' Up! February Blog Hop,
Shaz here - I am Creative Designer this month.
I chose a sketch as inspiration for the theme of this Blog Hop.
I always find scrapbooking so much easier if I have a sketch to follow.
Fellow Creative Design team member Courtenay created the sketch for me from
one that I had seen on Pinterest...Thanks Courtenay <3
Do you know that Scrapbooking Global has it's very own Pinterest Board
You may have just come from Delys Cram's Blog Or you are just starting the Hop with me, I have a few little tricks up my sleeve for this sketch today. I just LOVE how our
products can be used in more ways than the one that they were designed for.
I apologise for the VERY WORDY and heavy Photo Loaded Blog post...
We have 18 talented Stampin' Up! Demos from around the world joining us today...
Sooo much inspiration, use the sketch below to create your own layout...

I started by creating my layout on a piece of 12x12 Whisper White cardstock,
as soon as I hit it with the watercolour background I didn't like it.
SOOO that ended up in the bin..So I grabbed a piece of 12x12 Watercolour paper from my stash (Non Stampin' Up! unfortunately) and proceeded to create my new background...
as soon as I hit it with the watercolour background I didn't like it.
SOOO that ended up in the bin..So I grabbed a piece of 12x12 Watercolour paper from my stash (Non Stampin' Up! unfortunately) and proceeded to create my new background...
I don't know about you BUT I tend to follow the sketches very closely, can you see the
watercoloured background in the sketch? Did you include it or NOT?
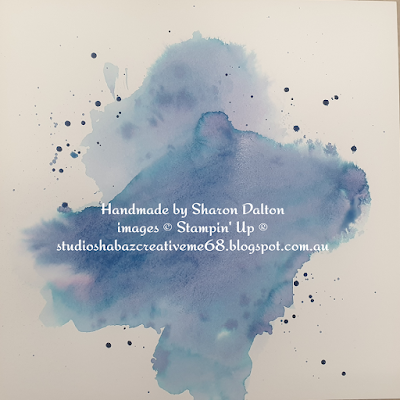
How I created my watercolour background is I add Night of Navy Classic Stampin Pad to a large block and then spritz it until I am happy with how wet it is and then I spritz my cardstock and use a large brush to lay the colour over the general area I want to watercolour look. I keep blending water to the areas that I want lighter, remembering though as it dries it becomes lighter. Where you can see the darker spots that is almost full strength colour. Next I grabbed my brush and filled it with ink and then set about to splatter my page. I am very happy with my background, it is a little larger than I hoped BUT it will work. Using the Heat tool I dried off the moisture and your layout will become all lumpy bumpy now, so when the layout is complete I add a layer of our backing cardboard from the DSP.
watercoloured background in the sketch? Did you include it or NOT?
How I created my watercolour background is I add Night of Navy Classic Stampin Pad to a large block and then spritz it until I am happy with how wet it is and then I spritz my cardstock and use a large brush to lay the colour over the general area I want to watercolour look. I keep blending water to the areas that I want lighter, remembering though as it dries it becomes lighter. Where you can see the darker spots that is almost full strength colour. Next I grabbed my brush and filled it with ink and then set about to splatter my page. I am very happy with my background, it is a little larger than I hoped BUT it will work. Using the Heat tool I dried off the moisture and your layout will become all lumpy bumpy now, so when the layout is complete I add a layer of our backing cardboard from the DSP.

Next I added some script font from Parisan Beauty Cling Stamp using Gray Granite Classic Stampin' Pad. I did draw myself some guidelines using the pencil marks I was able to line up the font which can be quite tricky with a red rubber stamp so that I could try to make it straight on my layout...
Next I spritzed Frost White Shimmer Paint all over the top half of the layout through a stencil I created with the Stitched Lace Die...It is a very intricate die so you can't really see the design here.

Next I spritzed Frost White Shimmer Paint all over the top half of the layout through a stencil I created with the Stitched Lace Die...It is a very intricate die so you can't really see the design here.

Next I created a border with our Delightful Tag Topper Punch,
I can hear you asking me BUT how???
I simply cut a strip of DSP 2" wide and slid it through the side of the punch rather than where you make the individual tags. Then I just punch one tag shape, moved it along then punched another and so on and so forth...
I love it when we can find alternative ways to use our Stampin' Up! products.

Next I added a thin strip of our Perennial Essence 12 x 12 Vellum Cardstock
over the top of the B&W DSP then I added some of the co-ordinating
Braided Burlap Trim from the Tropical Oasis Suite.
Then I started building up my photo and mats, I do not like wasting cardstock or DSP...
I used Tropical Oasis DSP And FREE Honey Bee DSP
So I just run it through the bigshot and cut out some shapes with our dies.
Also because the base of my layout has been wet, it is all out of shape when it dries.
I like to add a cardboard base to my photo just to give it a bit more stability.

I created a little pocket for another photo from this photoshoot


I decided that I needed some texture on my punched Story Label
piece of DSP so I ran the Brown hessian kinda DSP through the Coastal Weave 3D Embossing Folder which gave it this beautiful texture!!!
piece of DSP so I ran the Brown hessian kinda DSP through the Coastal Weave 3D Embossing Folder which gave it this beautiful texture!!!


I used the leftover flowers from this card that I created for this Blog Hop
Here is how I created the flowers and leaves

Watercoloured Background is my choice, with white heat embossed images
over the background. Products used the Watercolour Paper,
Stampin' Refills and Stampin' Spritzer to
create the backgrounds for my hibiscus and frangipani.
I used the following colours - Daffodil Delight, Grapefruit Grove,
So Saffron and Real Red Stampin Refills.
To recreate my background for my flowers I firstly stamped each individual floral
image onto the Fluid 100 Watercolour Paper with Versamark and then added the White Embossing Powder and used my Heat gun to heat set it...Did this all over my paper.
Using this technique it allows the ink to pool around the heat set image.
Once all the images were on my background I randomly added watered down spots
of ink all over the paper and wet it with a spritzer and watched the magic happen.
Use your heat gun to dry this off and then Die cut your floral images...
Here is the end result, pretty hey. So much variation in colour.

I just inked up the stamp with a couple of
the colours and then spritzed it very lightly and
stamped it on the
background. The leaf background was created using Soft Sea Foam,
Mint
Macaron, Pear Pizzazz and Pool Party.

Here is what it looked like at the end, then I just die cut the leaves
Well here is the finished layout, I had so much fun creating this layout...
I hope you enjoyed the processes of creating this for Feb Sketch Blog Hop.

Here is the extra photo from the Photoshoot, it is hidden behind the large photo

Up next is Maï Chapelain with her Beautiful Poppies layout, I just had to have a sneak
peak at what she created before posting my layout...
peak at what she created before posting my layout...

Below you will find the list of full participants, if for some reason the links are broken
follow along via the list...
Cheers Shaz

Thank you to the entire Scrapbooking Global - Stampin' Up Team for all their
help in the running of the Group...Without all of you these Blog Hops and the
activity on the group would not work as well as it does.
Thank you to everyone else for continuing to support Scrapbooking Global
Blog Hops and the challenges that you all participate in...
help in the running of the Group...Without all of you these Blog Hops and the
activity on the group would not work as well as it does.
Thank you to everyone else for continuing to support Scrapbooking Global
Blog Hops and the challenges that you all participate in...
Wooowww love this mixed media kind of layout!!!
ReplyDeleteJust Stunning and love all of the step by step tips! Just loved this sketch thanks so much!
ReplyDeleteWaouh! all is perfect. You use so much technique in this layout! I love everything...ant the hidden photo is such a great idea
ReplyDeleteOooh all those elements work so well together!
ReplyDeleteWonderful, Sharon. I love the way you showed your process and the final page is all style. Thanks for sharing
ReplyDeleteSharon this is stunning! Love everything about it!
ReplyDeleteStunning!! You create the best pages, Sharon. Love your step by step and your tip for the punch.
ReplyDeleteOh my giddy aunt!! What a stunning Page Sharon! I love all your clever ideas and techniques AND how you explained how do to it so well, Thank you. x This page is gorgeous and well worth the time it must have taken! Love the secret pocket too xxx
ReplyDeleteLove your page, Sharon! Great idea to use a sketch to see so many options.
ReplyDeleteLove all the photos showing the step by step process - so clever to remember to take photos while you're in the process!! The watercolouring is just gorgeous - every part of it! Love the extra pocket too and the bright flowers contrasting to the lovely subtle wash elements in the background. So inspirational and amazing.
ReplyDelete