

Welcome to The Spot #146 - Case the Designer Jay Soriano.
Jay Soriano is part of the incredibly talented Mitosu Crafts from UK...
I have long since followed Jay and his designs BUT this is my first time caseing him.


and Weekly Cardmaking Challenges to CASE (Copy and Selectively Edit) in my case
one of Jay's designs from his Blog and link it to this post
Here is the Post from Mitosu Crafts Blog that I decided to CASE
Jar of Flowers Stamp Set
The Jar of Flowers set belongs to the Flowers for Every Season Suite.
You can find it on pages 10-12 in the Annual Catalogue.
It is a
Reversible set with 9 photopolymer image designs. It also coordinates
with the Jar Punch and can be ordered as a Bundle with a saving of 10%.
For my card ideas, I coloured the floral images with Stampin’ Blends Markers and used Repeat Stamping technique. I also used Make A Difference stamp set for the sentiment. Which also allows for further card customisation with the alphabet scripts in the set.
Jar of Flowers Card 1
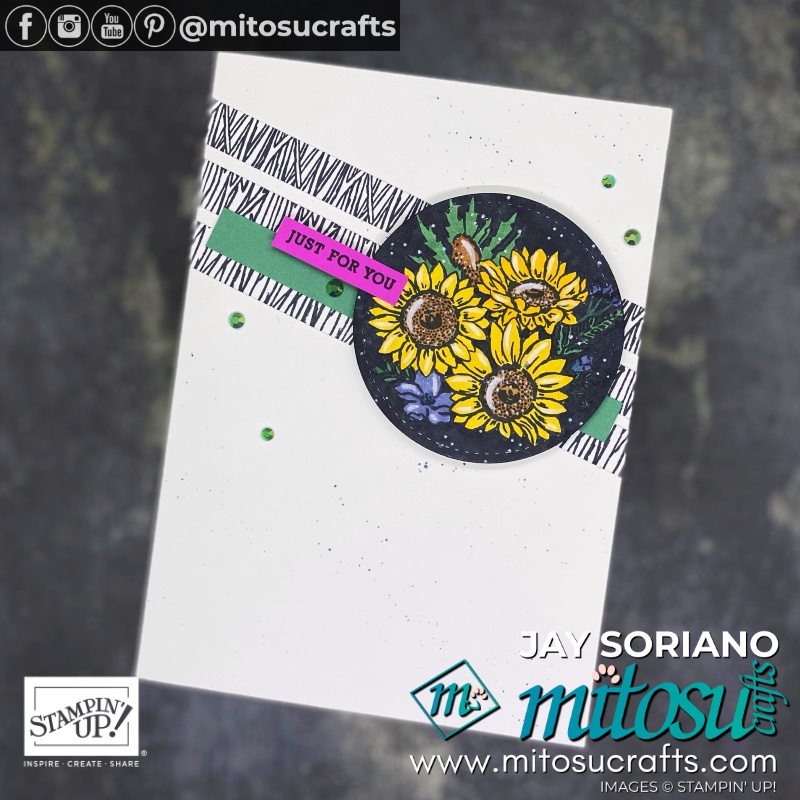
For this card, I stamped the sunflower design on Whisper White card in Memento ink. The colours of Stampin’ Blends Markers I used were: Mango Melody, Just Jade, Misty Moonlight, Cinnamon Cider and Basic Black. I also used the Misty Moonlight to add splatters on the Whisper White Thick card base. The Stampin’ Chalk Marker adds highlights and interest on the topper as well.
The design on the diagonal strips comes from repeat stamping the
stalks design in the set.
Stamped on Whisper White card with Memento ink
then cut into strips of 1cm or 3/8″.
I then added the strip of Just
Jade card and the sentiment on Magenta Madness card.
Finishing off with
the Flowers for Every Season Gems.
Some of the products from our NEW Jan- June Mini Catalogue.
Forever and Always Bundle pg 11 - 156200 - $79
True Love Designer Series Paper pg 11 - 154281 - $20
Gilded Leafing Embellishment - pg 33 - 154560 - $15.75
Resin Hearts - pg 55 - 154578 - $12.25
I cut up my B&W True Love Designer Series Paper (DSP)
into 1/4" strips first and then laid them across the top quarter of my card front.
Next I added a 1/4" piece of Flirty Flamingo cardstock over the top of the DSP.
I punched out a circle with my 2" punch out of Black cardstock
and ran it through the subtle embossing folder.

Next I stamped the Largest flower design from Forever &Always Stamp Set
with Memento Tuxedo Black Ink so that I could colour it with Blends.
When using Blends you must use a water based ink with the alcohol based blends.
Otherwise your design will bleed and not look very good.
I used Petal Pink L and Poppy Parade L to colour in my flower.
I completely coloured the flower in Petal Pink and then used the Poppy Parade to
add highlights to the flower in the centre and around the edges.
I then added a light cover of Tombow Glue to the centre and the edges and
placed that to the side to let it dry and become tacky
so that I could add the Gold accent of the Gilded Leafing Embellishment.
It doesn't take a long time to do this process BUT the Gilded Leafing
gets everywhere if you are not careful...Once the glue on the flower is tacky you simply add the Gilded Leafing to the glue areas and cover it until all is covered...
Then you need a hard stipple brush to brush away the excess Gilded Leafing...
Next thing I did was Die Cut the word LOVE from the Always Dies
out of Whisper White Cardstock and then in these Dies there is also a shadow
to put behind the LOVE word which I die cut out in Black Cardstock
using our BRAND NEW Mini Stampin' Cut & Emboss Machine...
Makes life so much easier with this lil girl...
Next I stamped the You So Very Much in Memento Tuxedo Black Ink
toward the bottom of my card more on the right side so that I could
add my Die Cut word LOVE above it!!
Then added 3 little white Resin Hearts from the Snailed It Bundle
Such a Gorgeous design this card that it doesn't need much to embellish it.

Then I created a smaller version for the inside using Petal Pink D and Poppy Parade L

I totally enjoyed CASEING Jay's design, You should give it a go! Link Up here
BUT as you can see you can make your very own version of his designs.
Thank you for visiting my Blog, Hope that I have inspired you to join in the Challenge #146
Cheers Shaz
No comments:
Post a Comment
Hope your day was AWESOME, and involved creating something that made your heart happy <3 Thanks for your comment, I appreciate you taking the time <3
In line with new Data Protection legislation (GDPR) by commenting you do so in the knowledge that your name & comment are visible to all who visit this blog and thereby consent to the use of that personal information for that specific purpose.
Thank you for leaving a comment. I love and appreciate your feedback.