Sunday 19 May 2024

ESAD - Annual Catalogue 2024-2025 Blog Hop


 It's been a while since we have had an ESAD Blog Hop, I am so pleased we are BACK.
We are a group of Australian and New Zealand Demonstrators
who LOVE to show you something NEW from Annual Catalogue


You may have started with me or joined me from Leonie Schroder's Blog

 Today we are all sharing projects made with products from the 2024-2025 Annual
catalogue released on the 1st of May this year. 
This catalogue has sooo many gorgeous suites,
the one I chose is what I call a mega suite.
My favourite is Unbounded Beauty on page 52 & 53. 
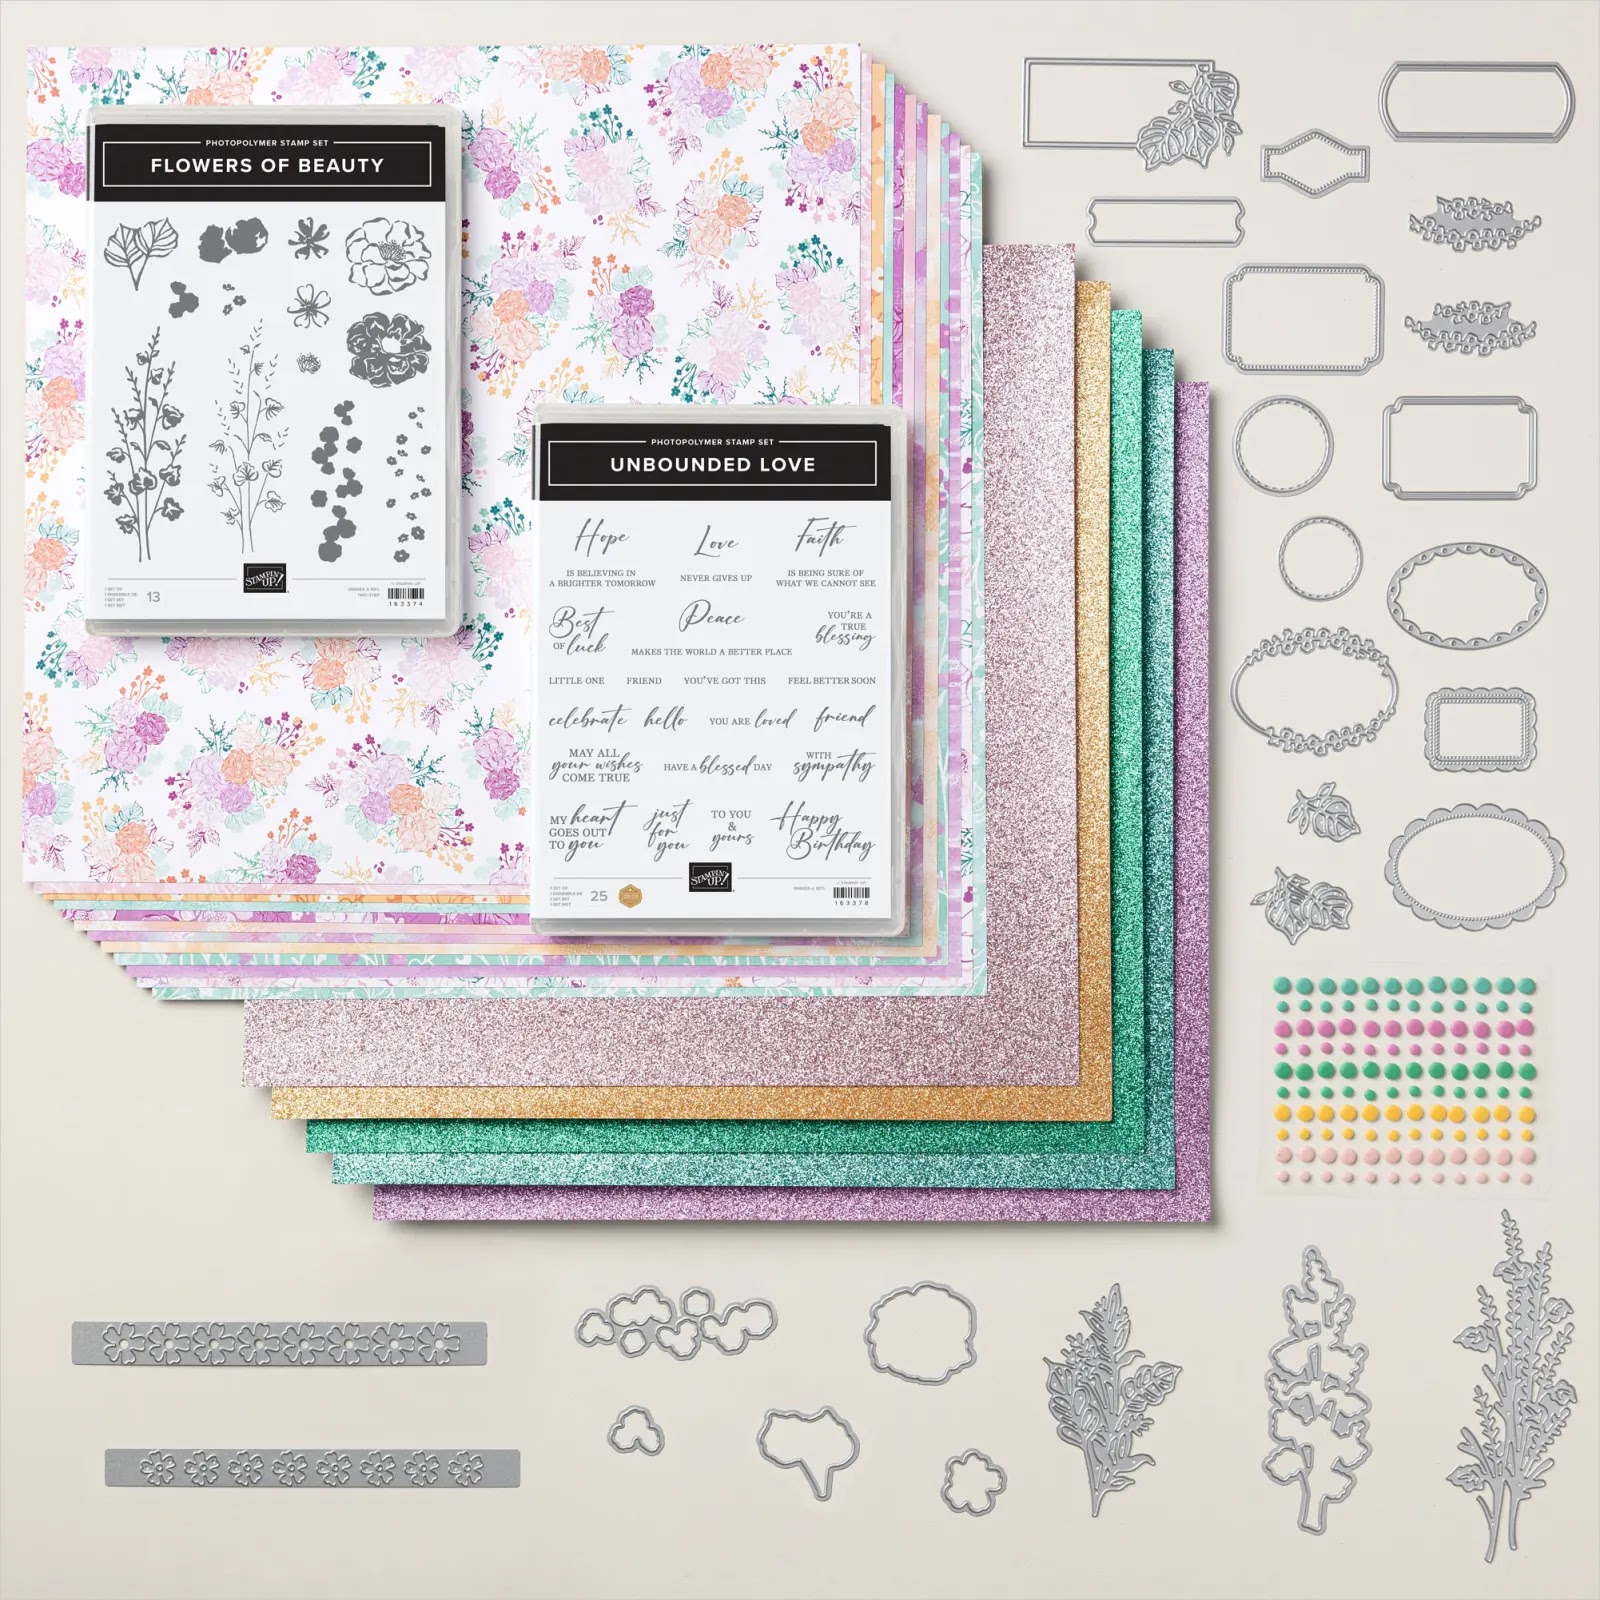

.
2 Stamps and 2 Dies, Flowers Of Beauty and Unbounded Love
12" x 12" Unbounded Beauty Designer Series Papers,
2024-2026 InColor Glimmer Paper and
2024-2026 In Color Resin Dots.


My card is very simple, the sentiment says it all.
Sympathy cards are not nice ones to make, BUT are necessary unfortunately.

Card Measurements - 

Petunia Pop - 9" x 4 1/8" scored at 5 7/8"
Petunia Pop - 4 1/8" x 2 3/4"
Basic White Cardstock - 4" x 2 1/2"
DSP - 4" x 3 7/8"
Basic White Insert - 5 5/8" x 3 7/8"

I have used Flowers of Beauty Stamp on both the inside and outside of the card
Stamping the Leaves in Summer Splash
Then the 2 step stamp to create the "hollyhock" flowers (well that is what I am calling them)
Firstly I stamped the solid image in Pretty In Pink
Then the filler flower in Petunia Pop.

I only used a very small piece of DSP for the front panel.


Both the outer and inner sentiments are from the Unbounded Love
stamped in Summer Splash

Lastly I added some 2024-2026 InColor Resin Dots on the front panel


 Up next is Denise Buetler


Blog Participant List 


1.      Nicole Wilson

2.      Rochelle Laird-Smith

3.      Lou Kitzelman

4.      Tracy Held

5.      Monique Fielder

6.      Leonie Schroder

7.      Sharon Dalton (you are here!)

8.      Denise Buetler

9.      Kathryn Ruddick


All Supplies used in this project are linked at the end of the post.
These products can be purchased in my Stampin' Up! ® online store

I want to say a HUGE THANKS to you who visit my blog <3 
I really do appreciate you leaving me some Lovin' in the form of a comment.
 

Being CREATIVE is not a hobby it is a way of life
Cheers Shaz


Thursday 16 May 2024

Scrapbooking Global Blog Hop - May 16th 2024 - 3 Favourite Colours


Welcome to Scrapbooking Global Blog Hop - May 16th - 3 Favourite Colours.
Scrapbooking Global - Stampin' Up! FB group consists of over 9,700 members.
Some of these are demonstrators from all over the world who all LOVE to scrapbook
and document their everyday lifestyle for generations to enjoy into the future. 

We welcome anyone who wants to be inspired.
We are trying to encourage EVERYONE to join in the HOP's every month.
We prefer that you do have a Blog so that you can join the hop every month.
BUT you don't have to have a blog to participate in these monthly challenges.
You can upload a photo to the Album of the Month after 2pm AEDT.
You can JOIN Scrapbooking Global - Stampin' Up! FB group here


 It is so wonderful that we have had our Guest Designers pick our themes for this year,
Alison A. Carter has chosen her theme to be 3 Favourite Colours. 
Alison creates BEAUTIFUL scrapbooking layouts and I wonder which colours
from our amazing colour range she chooses.


 Here is my layout, for my 3 favourite colours from A Little Latte Suite.
Today I have chosen to use Petal Pink, Calypso Coral and Early Espresso.
A friend gave me a share of her DSP from this suite.
Sooo I just used the papers to create this simple layout.
AND I also used So Swirly Embossing Folder.


I also used two different lettering to create my titles
Alphabet Al A Mode and Mini Alphabet

Up NEXT is Julia Quinn with what I am guessing is her favourite colour - Green


All Supplies used in this project are linked at the end of the post.
These products can be purchased in my
Stampin' Up! ® online store

I want to say a HUGE THANKS to you who visit my blog <3 
I really do appreciate you leaving me some Lovin' in the form of a comment.
 

Being CREATIVE is not a hobby it is a way of life
Cheers Shaz


May 2024 New at SU! Blog Hop: 2024-2026 In Colors - Nan Nan's Garden of Love


Welcome to New at SU! - May 2024 HOP THEME: 2024-2026 In Colors
Show off the NEW In Colors with a project featuring
ONE, TWO, THREE or ALL of the new hues!
You may have started the Blog Hop with me or come via Rachael Merrick's Blog
Either way you will be in for a treat with all this inspiration today.
 
 This is a very simple layout, using all the colours from 2024-2026 InColors.
Very time poor lately and I need to create a quick scrapbook layout.

I have created the whole layout using the 6" x 6" InColors DSP stack.
I stamped the stems of the flowers in Shy Shamrock Classic Stampin' Pad
across the border of the 12" x 12" Basic White Cardstock..
Then I cut 2 x 1/4" strips of Summer Splash DSP to cover over the stems.


I stamped the flowers from Spotlight on Nature onto the
6" x 6" InColors DSP of
Peach Pie, Pretty In Pink and Petunia Pop using the matching Stampin' Pad.
Then fussy cut out the flowers adding Stampin' Dimensionals to the largest flowers.
Simply using Multipurpose Tombow Glue I added the smaller petals to the stems and
then added the largest petals.
I flicked some light splatters on and around the bottom of the page with my
Shy Shamrock Stampin' Blend.  By gently flicking the tip out of the lid.

Next I added Adhesive Sheets to the back of the Pretty In Pink DSP and diecut out
a heap of letters with Mini Alphabet die to create the Title - Nan Nan's Garden Of Love.
Adding a slight border of colour around the letters with the Petunia Pop Stampin' Blend.
Then I added these to the bottom of the flowers.


The photo I have used was from a photoshoot that Eloise wasn't too happy about.
So this photo was one of those quick lets get the photo while she is kinda happy.
1st and 4th generations in this photo.


The photo mat is from Summer Splash 6" x 6" InColor DSP.

Lastly I added the Love You embossed die-cut from Thoughtful Moments
Hybrid Embossing Folder that you can emboss and die-cut at the same time.
AND some Shy Shamrock Resin Dots


 Hope that you are inspired to stamp onto your DSP and use it to embellish your layouts. 
I use this technique a lot of times when I want a piece of my stamped image to have
some colour on it without colouring with our extensive range of colouring options.


Up Next is Karen Henderson
I cannot wait to see what Karen has created with Petunia Pop


All Supplies used in this project are linked at the end of the post.
These products can be purchased in my
Stampin' Up! ® online store

I want to say a HUGE THANKS to you who visit my blog <3 
I really do appreciate you leaving me some Lovin' in the form of a comment.
 

Being CREATIVE is not a hobby it is a way of life
Cheers Shaz


Sunday 5 May 2024

National Scrapbooking Day - Weekend of Scrapbooking - Day 2 - Unbounded Beauty


Welcome to Day 2 of National Scrapbook Day/Weekend

Yesterday I presented a Scrapbooking Layouts featuring the Unbounded Beauty Suite
and today I will share the 2nd video for our NSD/Weekend of Scrapbooking.
We (Lauren, Vicky and myself) hoped that you enjoyed our content yesterday
AND we are ready to do it all again!!!
My second video goes LIVE at 10am on my business page and YouTube
You can go check them out here.


I created this layout with some die-cut daisies and used them as a mask.
The mask I held down with a few sticky notes so that I didn't get any
blended ink from the Peach Pie Classic Stampin' Pad where I didn't want it.

I used the masked die-cut daisies to frame my photographs.
Then I added some stamped daisies over the page in Pretty In Pink Classic Stampin' Pad.

I had already stamped and die-cut some of the elements BUT I showed how I did that too.

After the video finished I added another set of leaves and glimmer dies around the TITLE
which was also added later as I can never think of a title immediately when creating.


My TITLE was created with Alphabet Al A Mode Dies and Mini Alphabet Dies.
I stuck Foam Adhesive Sheet behind my Basic White Cardstock and ran through the letters
for Worth, BUT I still felt like it needed an extra layer of lettering over the top.
So then I used Adhesive Sheet to the back of my Basic White and die cut the letter again.
Then I stuck them on top of the foam "Worth" title.


"The Wait" is also cut out with Mini Alphabet Dies where I put the adhesive sheet
on the back of my Basic White cardstock again so that they are easy to stick down.

I also added a journalling block behind my photos which comes from the
Memory and More Cards on pg 26 of the NEW Annual catalogue.


I just add a plastic bag(from our embellishments) that is stuck to the back of my layout that I can slip the journalling in and out of as it was an after thought.


All supplies used in the project are linked at the end of this post.
These products can be purchased through my Stampin' Up!
® online store

I want to say a HUGE THANKS to you who visit my blog <3 
I really do appreciate you leaving me some Lovin' in the form of a comment.
 

Being CREATIVE is not a hobby it is a way of life
Cheers Shaz

Saturday 4 May 2024

National Scrapbooking Day - Weekend of Scrapbooking - Unbounded Beauty


Welcome to Studio Shabaz - CreativeMe68 


I will presenting 2 Scrapbooking Layouts featuring the Unbounded Beauty Suite
over the course of this weekend to celebrate National Scrapbooking Day.
BUT we (Lauren, Vicky and myself) decided that we needed it all weekend long.
6 Layouts, 3 Designers!
 
Here is our sneak peak...
My first video goes LIVE at 10am on my business page and YouTube


My layout is created with 
every NEW InColor 2024-2026 Classic Stampin Pad
and 2024-2026 Stampin' Write Markers - Petunia Pop
drawn around  varying sized Stylish Shape Dies to create interest in the background.
Using the 2 Step Stamp Hollyhock flowers with 1st and 2nd generation ink of
Petunia Pop and Pretty In Pink
stamped background images lots of flowers
different sized circles and glimmer paper.


Some of the gorgeous Designer Series Paper from Unbounded Beauty Suite torn to show the white core of the DSP and then also tearing some DSP into strips.


The 5 large flowers are 2 step stamping as well, firstly stamped in Peach Pie then
2nd generation Pretty In Pink.  I love the way the designer created the petals in the solid image to show the layers of the flower.

The 5 leaves were stamped in Shy Shamrock and then Summer Splash ink


The 6 Shy Shamrock leaves were cut from Glimmer Specialty paper.


The frame with LOVE in it is cut from Petunia Pop Glimmer Specialty Paper then the
Shy Shamrock leaves were layered over the top of it .


I hope you enjoy the video process of how this layout came together.


All supplies used in the project are linked at the end of this post.
These products can be purchased through my Stampin' Up!
® online store

I want to say a HUGE THANKS to you who visit my blog <3 
I really do appreciate you leaving me some Lovin' in the form of a comment.
 

Being CREATIVE is not a hobby it is a way of life
Cheers Shaz